Showing posts sorted by relevance for query Fried Onions. Sort by date Show all posts

Vegetarian Omurice /Japanese Fried Rice Omelette#EattheWorld

Omurice, it's a Japanese invention that combines an omelette with fried rice. You'll often hear it referred to as omuraisu, omumeshi or omuretsu" and "raisu," the Japanese pronunciations of "omelette" and "rice" Some versions have the rice rolled up in the omelette
I'm also sharing here, a traditional Capsicum Ketchup, since it's easy and tasty, while the recipe calls for Okonomiyaki Sauce.
Japanese Omurice is made with chicken, but Koreans commonly use beef, pork or ham as well. Shrimp is another good option.
I have used vegetables, like carrot, onion, and scallion. You can also add  celery, zucchini, or mushrooms. 

I used 2 eggs per serving for this recipe, but you can use 3 if you want a thick omelette covering your rice. You can also add a little bit of heavy cream or milk for a softer omelette, but I didn’t include it in this recipe. This is an easy fried rice flavored with sweet, tangy ketchup and wrapped in an egg omelette.
Serves 2
Ingredients

1 Medium Onion - finely chopped
1 Scallion - finely chopped
1 Small Carrot - finely chopped
½ Teaspoon Black pepper powder
1 Tablespoon Soy sauce
3 Tablespoons Capsicum Ketchup - recipe below
½ Teaspoon Salt
2 Tablespoons Oil or as required for pan frying
2 Cups Heaped Cooked Cold Rice -
4 Eggs
To Make the Kewpie Mayonnaise
1 Cup Mayonnaise
¼ Teaspoon Garlic powder
2 Teaspoons Tomato Ketchup

Method
Prepare the fried rice ingredients by finely chopping all the veggies.
Heat a large skillet over medium high heat f oil. Add the onion, scallion, carrot and stir fry until the onion turns soft. Stir in soy sauce, salt and pepper to taste.

Reduce the heat to medium. Add the rice, and stir well until the clumped up rice is broken up and all the ingredients are well combined. Add capsicum ketchup (adjust to taste), salt and pepper to taste, continue to stir until the ketchup is evenly incorporated into the fried rice. Keep this aside.  

Heat a lightly oiled small non-stick pan over medium low heat.

Crack and beat 2 eggs in a bowl with a spoon or a fork. Stir in a pinch of salt. Add the egg mixture to the pan and swirl it around to cover the pan.

When the bottom is set but the top is still runny, turn off the heat and add one serving of the fried rice in the middle of the egg omelette.  Using a spatula, fold both sides of the omelette over the rice. Push the whole Omurice to the side of the pan.
Flip it onto a plate. Top it off with a squeeze of ketchup or Kewpie mayo. It's ready to enjoy.

Capsicum Ketchup
Ingredients
1 Tablespoon Olive Oil
1 Medium Onion - finely chopped
1 Large Red Capsicum - roasted
200Ml Tomato Puree
4 Ripe Tomatoes - chopped
¼ Cup Apple Cider Vinegar
1 Stalk Celery - chopped
1" Piece Ginger - chopped
4 Cloves Garlic - chopped
¼ Cup Dark Brown Sugar
2 Teaspoons Honey
1 Teaspoon Salt
½ Teaspoon Coriander powder
¼ Teaspoon Nutmeg Powder
¼ Teaspoon White Pepper

Method
Roast the capsicum in a preheated oven at 180°C for 15 minutes or until the skin start to blacken or on the gas flame. Wrap the capsicum, in aluminum foil, fold over the edges to seal and trapped steam which will help loosen the skin from the capsicum. Once cooled, peel the skin off, de seed it and roughly chop them.
Add the olive oil to a pan and sauté the onions, celery, ginger, and garlic until they are just starting to turn brown around the edges. Add the capsicum, dark brown sugar. Cook, stirring until the sugar has melted. Add the chopped tomato, vinegar, tomato puree and salt, Gently simmer over low heat, stirring regularly. Once the softens and the sauce starts to thicken, switch off the flame. Allow the mixture to cool. 
Add the cooled mixture to a food processor or blender and process until smooth. 
I wanted the ketchup smooth, so passed the blended mixture through a fine sieve and discarded the solids. Now add the sauce back into the pan, add in the honey, coriander, nutmeg and white pepper powder. Give this a good mix and bring this to a boil, reduce the flame and it simmer till it form a thick sauce consistency, switch off the flame, cool. 
Capsicum Ketchup is ready.
You can freeze the remaining in an airtight container for 2 - 3 months.

My Notes
If the rice is a bit too hard after being in the fridge, heat it up in the microwave to soften it a little.
You can also shape the Omurice by hand using aluminum foil or a paper towel. Drizzle some ketchup on top. Repeat the last 3 steps for another serving.
Labels: Omurice, Japanese, Asian Cuisine, Vegetarian, Egg, Kwepie, Mayonnaise, Capsicum, Ketchup, Homemade, Eat the World
                   
Each month a group of us join Evelyne of CulturEatz as she travels to different countries to Eat the World. This month it's secret Santa wherein we can choose any dish by the blog assigned to us.  
Check out all the wonderful Japanese dishes prepared by fellow Eat the World members and share with #eattheworld. Click here to find out how to join and have fun exploring a country a month in the kitchen with us! 
 Amy’s Cooking Adventures: Yoshinoya Beef Bowl (Gyudon) 
A Day in the Life on the Farm: Japanese Rice 
Pandemonium Noshery: Ginger Pork Stir Fry 

Continue Reading
3 comments
Share:

Moroccan Rghaif#BreadBakers

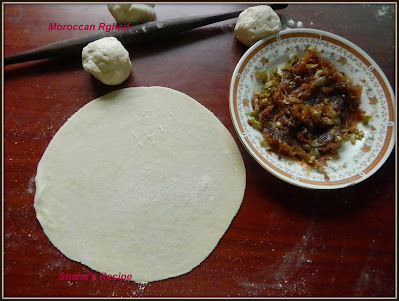
Rghaif is a squared flatbread usually eaten in Morocco for breakfast or tea time. You can have them plain or stuffed, sweet or savory, their texture is very soft. It’s richer, but also crispy and super comforting. I have made a vegan version of this bread. This is also made with a meat, caramelized onions filling and there’s many ways to prepare this bread. Traditionally they are individually pan-fried but we can also bake them.
Ingredients
For The Dough
1 Cup Heaped All Purpose Flour
2 Tablespoons Semolina
¼ Teaspoon Salt
2 Tablespoons Oil 
For The Stuffing
2 Tablespoons Oil
1 Cup Sliced Onions
Salt to taste
2 Chopped Olives
2 Chopped Jalapenos

Method 
Prepare The Dough
Mix the flour and semolina together. Add oil and mix well, then keep adding little water at a time and knead to a stiff dough. Keep aside covered for at least 15 minutes.
In the meantime let's make the stuffing
In a pan heat oil, add the onions with add a pinch of salt and sauté until light golden brown/caramelized. 
Transfer the onions in bowl add olives, jalapenos and mix well.
Divide the dough into 4 parts and roll each into a round circle about ¼ inch thick. 
Place the filling in the center and now fold it like an envelope to make a square. Lightly roll it to make it slightly thin and to even out the stuffing.
Fold it into a square parcel.
Roll this square rghaif to flatten it a little.
Heat a skillet with oil and fry these on low flame until golden on both sides. 
Serve hot with pickle.
Labels: Moroccan, Middle Eastern, Stuffed Flatbreads, Caramelized Onions, Breads, Bread Bakers, Vegan, Pan Fried

#BreadBakers is a group of bread loving bakers who get together once a month to bake bread with a common ingredient or theme. You can see all our of lovely bread by following our Pinterest board right here. http://www.pinterest.com/flpl/bread-bakers/ Links are also updated after each event on the BreadBakers home page. https://www.foodlustpeoplelove.com/p/breadbakers.html 

We take turns hosting each month and choosing the theme/ingredient. 

Continue Reading
7 comments
Share:

Chicken Masala In Coconut Gravy

Made this for a dinner party. This is so delicious the aroma roasted spices and coconut come together so well, its a delicious curry goes well with rotis, naan, or even steamed rice or pulao.

Ingredients 

2 Kgs Chicken - cut into medium pieces
6 Medium Onions - thinly sliced
3/4 Cup Packed Grated Fresh Coconut
2 Tablespoons Ginger Paste
2 Tablespoons Garlic Paste
3 Teaspoons Turmeric powder
4 Teaspoons Red Chilly powder or per your spice tolerance
600 Grams Fresh Yogurt
To Dry Roast Each Separately 

2 Bay leaves
4 Teaspoons Level Coriander seeds
2 Teaspoons Level Cumin seeds
2 Teaspoons Level Fennel seeds/Saunf
16 Green Cardamons/Elaichi
2 Badi Elaichi / Brown Cardamom
4 One Inch Stick Each Cinnamon
16 Cloves 

20 Whole Black Peppercorns  
2 Flowers Star Anise
1 Whole Flower Mace/Javitri
4 Teaspoons Sesame seeds
16 Nagkesar - see notes  
2 Small Pieces Dagad Phool/ Black Stone Flower
1 Cup Oil
2 Teaspoons Salt or according to your taste 

Method 
Marinate chicken in ginger garlic paste, half the quantity salt and turmeric for about 30 to 45 minutes.
 Dry roast given whole spices in a pan on sim, till fragrant. When cooled grind this to a fine powder. Remove and keep aside.
Lightly roast coconut in the same pan. Keep aside to cool.
Heat oil in a thick bottom kadai, add onions, fry on medium flame, till golden brown. Drain the onions well and remove with a slotted spoon. Keep this in a blender with the roasted coconut. 
Grind onions, and coconut with little water to a make fine paste. 
In the same pan that the onions were fried add more oil if necessary add marinated chicken pieces to the pan. Fry till chicken well and oil starts to leave the sides of the pan. Add chilly powder and fry for a 2 minutes or till oil separates. 
Add ground paste, spices and curd mix well, let this cook again till oil surfaces. 
Now add water depending on the consistency you want. Bring it to a rolling boil on high flame. 
Cover and cook on low flame for 10 minutes, or till chicken is done. Transfer to a serving bowl. 
Garnish with chopped coriander leaves and fried potato wedges. 
Enjoy !! 

My Notes 
Many are confused on Nagkesar and Kabab Chini here are both the pics 
Kabab Chini is round has short tail 
 Nagkesar a little long and has a fine tail 
Labels : Chicken, Coconut, Main course

Continue Reading
No comments
Share:

Tandoori Prawn Biryani For One#FishFirday

This is  mouth-watering , yummy and super delicious dish it's an exotic biryani for sea food lovers.  This does not require any grinding it's so easy.
Ingredients 
150 Grams Cleaned Prawns
½ Teaspoon Freshly Minced Ginger
½ Teaspoon Freshly Minced Garlic
½ Teaspoon Level Sea Salt
½ Teaspoon Red Chili powder
½ Teaspoon Heaped Coriander powder
½ Teaspoon Level Cumin powder
1 Teaspoon Heaped Homemade Tandoori Masala
2 Whole Green chilies
Tablespoons Heaped Yogurt - beaten
1 Large Onion - sliced
½ Cup Oil
¼ Teaspoon Garam Masala powder
1  
Teaspoon Lemon juice 
1 Teaspoon Kasuri Methi
2 Tablespoons Coriander leaves - finely chopped
A Pinch Yellow color
1 Large Potatoes - cut into small cubes and parboiled
For the Rice 
1 Cup (1
50 ML Cup Measurement) Level Basmati Rice
1 Teaspoon Heaped Sea Salt
1 Bay Leaf
Method
For the Prawns

Marinate prawns with salt, chilly powder, ginger garlic, cumin, coriander powder, kasuri methi, yogurt, and tandoori masala. Mix it well and keep it in the refrigerator for at least 30 minutes.

As the prawns are getting marinated. Let's cook the rice.

For the Rice

Wash and soak the rice for at least 15 minutes. In a sauce pan bring a liter of water to a rolling boil add the, bay leaf, salt and the rice, lightly give it a stir and then cook till done but firm. Drain and keep aside to cool.

To Assemble the Biryani

In a thick bottom pot / vessel heat oil, add the sliced onions till golden and crisp ( remove a little for garnishing) drain the oil and keep about 2 tablespoon oil in the pan,
add the , parboiled potatoes, fry till the potatoes are lightly browned, 
Add half of the fried onions
now add marinated prawns, 
cover and cook for just a minute. 
Add the lemon juice, whole green chilles , half the coriander leaves and garam masala powder, give it a quick stir. 
Spread the boiled rice on top of the prawn mixture, topped with yellow color and remaining coriander leaves and browned onions 
drizzle a tablespoon of onion oil on top, cover with a tight lid, I covered it with aluminium foil, leave it on dum, on high for 3 minutes then reduce the flame and keep it on low for 10 to 12 minutes . 
Give it a stir lightly and serve 
Enjoy!!
Labels :  Prawns, Shrimps, Biryani, Easy, Seafood/Fish, Fish Friday, Main course, One Dish Meal
Fish Friday Foodies June 2020
Fish/Seafood Biryani Recipes
Hosted by Sneha

Here is the final HTML
Instant Pot Shrimp Biryani from Making Miracles
Prawns Biryani + Homemade Naan from Culinary Adventures with Camilla
Shrimp Biryani from Karen's Kitchen Stories
Bay Scallop and Shrimp Biryani from Food Lust People Love
Tandoori Prawn Biryani For One from Sneha's Recipe
Seafood Biryani from  A Day in the Life on the Farm

Continue Reading
5 comments
Share: