Showing posts with label Foodie Extravaganza Party. Show all posts

Grapefruit Chaat Salad Bowl#Foodieextravaganza

This is a simply lip smacking tangy salad bowl. It's so delicious that you will love it, its also low carb, just 2 grams Carb per serving.
This pink-orange citrus fruit is not only beautiful but has a long list of health benefits like rich Vitamin C plus plenty of minerals like calcium, magnesium, phosphorus, and potassium. 
Serves Two
Ingredients

2 Large Grapefruit
1 Teaspoon Chaat Masala
½ Teaspoon Red Chilli powder
¼ Teaspoon Black Pepper powder
¼ Teaspoon Black Salt/Kala Namak
6 - 8 Mint Leaves

Method 
Peel the grapefruit and remove the white pith. Separate into segments, remove the seeds and place in a bowl.

Add red chilly powder, black pepper powder, black salt, chaat masala and mix well. Add mint leaves and mix.
Transfer onto individual serving bowls, garnish with a mint sprig and serve immediately.

Nutrition Info - Per Serving
Calories : 90 Kcal
Carbohydrates : 2 gm
Protein : 20 gm
Fat : 0.2 gm
Other : Vitamin C- 62mg

Labels: Foodie Extravaganza Party, Grapefruit, Salad, Chaat Masala, Healthy, Low Carb, Serves Two
Foodie Extravaganza February 2023 event National Grapefruit Month   

Continue Reading
3 comments
Share:

Keto Stuffed Cheesy Omelette With Sour Cream#Foodieextravaganza

This recipe doesn’t require flour (is gluten free) you can add the veggie to your choice and taste. A quick and easy makes an excellent Keto breakfast or a filling meal. Though this is mostly had for breakfast, I had it for my dinner, it was filling, cheesy and satiating.
Serves One
Ingredients

2 Large Eggs
1 Tablespoon Heaped Sour Cream
1 Spring Onion - finely chopped
1 Tablespoon Chopped Dill
1 Green Chilly - finely chopped
1 Tablespoon Each Chopped Green & Red Capsicum
4 Mushrooms - sliced
A Pinch Turmeric powder
1 Tablespoon Butter
Salt to taste
2 -3 Tablespoons Shredded Cheese

Method
In a pan heat a teaspoon of butter and sauté together the, onion, dill, green chilly, mushrooms, salt well. Sauté till the mushrooms are cooked. Remove from the pan and let is cool. In a large bowl break in the eggs, add sour cream and turmeric powder, beat it well with a fork or whisk to make it lightly and fluffy.
Heat butter in a frying6" pan and when hot pour in the egg mixture. Cover and let it cook on low flame for 3 - 4 minutes.  
Add the filling on one side of the omelette,  
spread the cheese on top.
Then fold it and cook till the sides is light golden. Take it on to a serving plate.
Enjoy with a generous helping of salad or steamed green beans.
This an healthy, delicious and filling omelette. 
Labels:
Breakfast, Main course, Omelette, Keto, Low Carb, Sour Cream, Dill, Spring Onion, Serves One, Foodie Extravaganza Party

In Foodie Extravaganza Party is celebrating National Egg Month for January, here are recipes for the event.    
 
Eggs in Hash Brown Nests from Karen’s Kitchen Stories
Egg Bacon and Brie Bagel Sandwich from A Day in the Life on the Farm
Keto Stuffed Cheesy Omelette With Sour Cream from Sneha’s Recipe
Pork and Egg Fried Rice from Palatable Pastime   

Continue Reading
2 comments
Share:

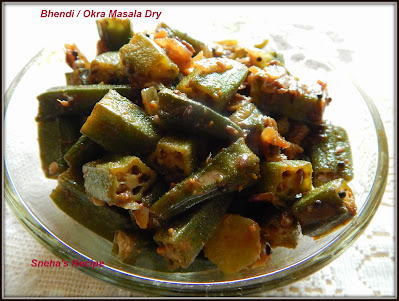
Bhendi / Okra Masala Dry#Foodieextravaganza

Bhendi also known as Okra or Ladies finger is a very nutritious green vegetable is available as year round so it's a regular in our weekly menu.
This Bhendi Masala Dry has great flavors, it's vegan and taste awesome. This can be enjoyed as a side dish with roti or rice.

Ingredients
200-250 Grams Bhendi / Okra
1 Medium Onion - chopped
2 Medium Tomatoes - chopped
¾ Teaspoon Ginger Garlic paste
1 Teaspoon Coriander powder
½ Teaspoon Red Chilly powder
½ Teaspoon Turmeric powder
½ Teaspoon Garam masala powder
½ Teaspoon Amchur powder
Salt to taste
2 + 2 Tablespoons Heaped Oil
1 Teaspoon Kasuri Methi

Method
Rinse the bhendi well in water and pat it dry then wipe with a clean kitchen towel.
Cut the top and the tail of the bhendi then chop them into 2" thick pieces.

Heat 2 tablespoons heaped oil in a kadai/wok or pan. Add the bhendi and saute till they are nearly cooked. Keep stirring them on medium flame. Once nearly cooked, remove the bhendi on to a plate keep aside. In the same pan heat another 2 tablespoons heaped oil, add the chopped onions and fry till they become translucent. Then add the ginger-garlic paste and sauté for a minute or till the raw aroma of the ginger-garlic disappears. Add the chopped tomatoes and sauté till the tomatoes are soft and mushy. If the tomato mixture becomes too dry add about ¼ or ½ cup water and continue to cook, don’t cover the pan with the lid till the tomatoes turn mushy. Now add all the dry spice powders, stir well and sauté for a minute or two. Add the sautéed bhendi, kasuri methi & salt and mix so that the onion-tomato masala coats the bhindi well. Cook for 2-3 minutes or till the bhendi is cooked, stirring in between. Once cooked switch off the flame.

Serve the Bhendi Masala garnished with some coriander leaves. Enjoy with chapatis, rotis or naan.
Labels: Foodie Extravaganza Party, Side Dish, Gluten free, Bhendi, Okra, Vegan, Lady Finger, Sabzi 
November is World Vegan Month, so we are celebrating this in Foodie Extravaganza. Check some of the other vegan recipes here.

Continue Reading
3 comments
Share:

Rose Cham Cham#Foodieextravaganza

Festival season is on and you will find varieties of Indian desserts, mithais or sweets confectioners in all textures, shapes, and color. All these colorful decadent treats are irresistible. I have already posted a Rasgulla recipe on blog check the recipe.

Today I'm posting a new flavor of Cham Cham which is a stuffed sandwich, has a Rose flavor and color. Cham Cham or chom chom is a Bengali delicacy. These pink cham chams are delicately laced with the flavor of cardamom and rose water.

What's the difference between a Rasgulla and a Cham Cham?
Rasgullas are round and fluffier they are not stuffed. While cham chams are oval/ rectangular in shape and are stuffed with a filling. The outer covering /raw materials are identical though, its all about how you make them. Traditionally most Bengali sweets the basic process of making are the same. The state of West Bengal in India is famous for its milk sweets like Rasgulla, Sandesh and other curdled milk mithais.

Serves 5 
Ingredients

For The Chena / Soft Paneer / Cottage Cheese

1 Liter Full Fat Milk
2 Tablespoons Lemon Juice or White Vinegar
For the Sugar Syrup
1 Cup Sugar
3 Cups Water
1 Teaspoon Corn Flour or All Purpose Flour
For The Filling
To Make The Homemade Instant Mawa / Khoya
½ Cup Full Fat Milk Powder
1 Tablespoon Milk
4 Teaspoons Condensed Milk
1 Tablespoon Desi Ghee
2 Drops Rose Essence
A Drop Red Food Color

Method
To Make The Chena/ Fresh Paneer
Boil whole milk in a heavy bottom pan, stirring continuously so that the milk does not stick at the bottom of the pan. Once it comes to a boil, switch off the flame let is rest for 2 - 3 minutes.
After two to three minutes. Add lemon juice gradually and keep stirring and let the milk curdle. Let it cool down and allow the milk to separate.
Place cheesecloth on a mesh strainer and strain the water. Rinse it under running water to remove the sourness of lemon juice and squeeze off the excess liquid. You can also hang it so that all the excess water drains off. Then take the chena in your hand and squeeze out remaining water slowly.
Let it sit until we make the sugar syrup.
To Make The Sugar Syrup
In a large pan mix sugar and water. Allow the sugar to dissolve and bring to a boil.

As the syrup is cooking let's work with the Chena.
Take the chena into a plate and add the corn flour, knead until smooth for 5-6 minutes. 
Make it lump free and smooth dough, the small piece of dough when roll should be crack free. So knead it really very well.
Divide this dough into 5 equal parts/balls 
Make rectangular shape / oval shape cham cham. You can also make any other shape you like. Roll this well first and then shape it rectangular.
To Cook The Cham Cham 
Once the sugar syrup boils and the sugar melts.
Gently slide in the prepared cham cham to it, cover and cook for 8 minutes on high flame.
After 8 minutes open the pan, flip each cham cham and cover and cook again for another 8 minutes on medium high flame. After 8 minutes, switch off the flame and let it rest with the lid on, cool it down completely. 
Let the cham cham remain in the sugar syrup for about an hour or more. They should cool down completely before you fill them.

To Make The Filling / To Make The Homemade Instant Mawa / Khoya
Check the recipe of the traditional method of making Mawa / Khoya on this blog.
Mix all the given ingredients well together. 
In a heavy pan add the prepared mixture and cook it for 2 -3 minutes on medium low flame. Keep stirring continuously till it thickens and start to form a ball.
It should be soft so do not cook it too long. Remove this into a plate and let is cool down. 
Add the rose essence, food color and mix well to get a uniform color. Our filling is ready now. Divide this into 5 equal parts, roll each into a rectangular shape smaller then the cham cham.
Remove the cham cham's on a wire mesh place it on a large plate to catch all the sugar syrup or else the counter top will become messy. Let all the syrup drain for about 5 minutes.
Take each cham cham and slit it halfway through lengthwise. Fill in the stuffing and decorate with sliver warq or nuts or glazed cherries. Rose Cham Cham are ready.  
Serve & Enjoy! Rose Cham Cham taste best when chilled. It can be stored in the refrigerator for 3-4 days.
My Notes
Use full-fat milk for this recipe
If you have ready store bought mava/khoya then grate - a100 to 150 grams of it this well just add 2 - 3 tablespoons of powdered sugar and mix well, taste for sweetness add more according to your taste, add essence and food color. 
Labels: Sweets & Desserts, Indian, Festival Sweets, Foodie Extravaganza Party, Paneer, Mawa, Homemade
For Foodie Extravaganza our theme this month is Simply Desserts!

Food Lust People Love: Clementine Pistachio Upside Down Cake 
Karen’s Kitchen Stories : Butterscotch Pots de Creme 
Sneha’s Recipe: Rose Cham Cham 
Magical Ingredients: Dried Fruits and Nuts Roll 
A Day in the Life on the Farm: Pumpkin Parfaits

Continue Reading
3 comments
Share:

Kothey Momo With Tomato Dipping Sauce#Foodieextravaganza

There are many varieties of momo / dumplings, one of them that we are going to make today is Kothey momo, these are steamed half-moon shaped dumplings which are pan-fried and served.

These handmade vegetable momo are served with a spicy tomato sauce and make a delicious appetizer or snack!
Kothey Momo is a signature Tibetan/Nepalese dish. It is a half fried and half steamed momo, often elongated in shape. The filling can be either vegetables or meat. They are served with different types of sauces to bring out that tangy pot-sticker flavor.  In traditional Nepalese cooking, Kothey momo are filled with pork or buff meat and these are served with soup.

Makes 9 Momo's
Ingredients
For Momo

1 Cup All Purpose Flour
Hot Water as required
½ Teaspoon Salt

For The Filling
1 Big Bowl Cabbage - chopperized
1 Medium Carrot - chopperized
1 Spring Onion - white and green part finely chopped
1 Teaspoon Sesame Oil
Salt and White Pepper to taste

Method
In a bowl add the flour and salt, keep adding hot water a little at a time with a spoon knead so that all the flour is slightly wet. Then with a your hand knead it into a slightly stiff dough and leave covered for 10 to 15 minutes.

For The Filling
In a pan heat oil add all the veggies and spring onion white part sauté on medium high flame till they are cooked but not mushy. Add salt and pepper to taste and keep aside to cool. Add the spring onion greens and give it a good mix

To Make the Momo
Divide the dough into 9 equal balls. Take each ball and roll into a small disc 3 inch diameter. Fill it with a tablespoons of the filling in the center and start to pleat it by pinching it and pleating it grab the other side and pinch it together. Similarly make the others like wise.
Heat up a pan with a lid. Add a tablespoon of sesame oil and spread it then place the momos and reduce the flame to low.  
Let it cook for 3 minutes when one side is golden/toasted turn the sides and cook on all sides.
When all sides are golden/toasted then make them stand again.
Add ½ cup water
Cover immediately with a lid, on medium low flame, cook for 3 minutes, you will see that the momos start to puff up.
Switch off the flame when the water dries and they are translucent and they are done.

For The Tomato Dipping Sauce
This dipping sauce may look difficult to make ... but believe me it’s not so, it’s super easy and the end result is just too good Do give it a try!

Ingredients
1 Large Tomato
2 Dried Red Chillies
2 Cloves Garlic
½ Inch Piece Ginger
1 Tablespoon Tomato Ketchup
Salt and Sugar to taste

Method
Add the tomato, ginger, garlic and chillies together in a pan with 1/2 cup water and boil till water has dried up and tomatoes have become mushy.
Let it cool and a then give a blitz in a mixer with some salt, sugar and soya sauce as per your taste and your finger licking momo's sauce is ready.
Labels: Momo, Asian Cuisine, Tomato, Dipping Sauce,Vegetarian, Vegan, Street food,Foodie Extravaganza Party
Foodie Extravaganza is where we celebrate obscure food holidays by cooking and baking together with the same ingredient or theme each month. Posting day is always the first Wednesday of each month. If you are a blogger and would like to join our group and blog along with us, come join our Facebook page Foodie Extravaganza. We would love to have you! If you're a spectator looking for delicious tid-bits check out our Foodie Extravaganza Pinterest Board.
    The theme for today's event is "Dumplings"  

Foodie Extravaganza is where we celebrate obscure food holidays by cooking and baking together with the same ingredient or theme each month. Posting day is always the first Wednesday of each month. If you are a blogger and would like to join our group and blog along with us, come join our Facebook page Foodie Extravaganza. We would love to have you! If you're a spectator looking for delicious tid-bits check out our Foodie Extravaganza Pinterest Board

Continue Reading
5 comments
Share:

Keto Beef Mince With Broccoli & Zucchini#Foodieextravaganza

This is a creamy delicious and simple main course dish to prepare. For this recipe you can substitute any Keto approved veggies, this will still taste yummy. Net Carbs per serving is just 7grams.

Serves 2
Ingredients

250 grams Beef Mince
150 Grams Broccoli florets with stalks
150 Grams Zucchini
¼ Cup Onion
2 Teaspoons Minced Garlic
½ Teaspoon Paprika Powder
½ Teaspoon Red Chilli Flakes
½ Teaspoon Fresh Thyme
25 Grams Grated Cheddar Cheese
2 Tablespoons Heavy Cream
25 Grams Cream Cheese
½ Tablespoon Coconut Oil
Salt & Pepper to taste

Method
I have used 80% lean and 20% fat beef mince.
Cut the broccoli florets from the stem and set them aside. Also chop the zucchini into small cubes or slices, however you like them.
Heat the oil in a skillet or non stick pan, add in the beef mince, add a little salt and pepper and then sauté for two minutes, then add in the onions and garlic.  Once the onions turn translucent and the garlic starts to brown add in the paprika, chilli flakes and thyme, give everything a good mix. Cook for a minute before adding the zucchini and the broccoli, season with salt and mix. 
Cover and cook for 4 minutes and then grate the cheddar cheese and add the heavy cream, mix well, cover and cook for another few minutes till the cheese melts. If there is too much stock in the pan cook till that reduces down ( this should be semi dry).
Finally add in the cream cheese and mix everything well. Serve with some fresh parmesan grated on the top and a sprinkling of paprika. 
Enjoy with Low Crab Coconut Flour & Oat Fiber Flatbread!!  
Labels: Foodie Extravaganza Party, Zucchini, Keto, Beef, Broccoli, Mince, Asian Cuisine, Main course, Serves Two
Foodie Extravaganza is where we celebrate obscure food holidays or cook and bake together with the same ingredient or theme each month. If you are a blogger and would like to join our group and blog with us, come join our Facebook page Foodie Extravaganza. We would love to have you! If you're a spectator looking for delicious tid-bits check out our Foodie Extravaganza Pinterest Board.

Posting day for #FoodieExtravaganza is always the first Wednesday of the month.
The theme for this month is "Zucchini"    

Continue Reading
3 comments
Share: