Showing posts with label Asian Cuisine. Show all posts

Cardilong Isda -Filipino#EatTheWorld

Cardilong Isda is a dish made of fried fish cooked or served with a sauce made of sautéed tomatoes, onions and beaten eggs.. I have made this gluten free by using oat's flour and coating it in cornmeal to make the fish crispy and it get's a crunchy texture. I just topped the sauce over the fried fish.

Ingredients
1 Whole Fish - I used Pomfret/Pompano
¼ Cup Oats Flour
¾ Cup Cornmeal
1 + 1 Eggs - beaten (1 for frying and 1 for sauce)
2 Medium Tomatoes - diced
1 Medium Onion- diced
3 Cloves Garlic - crushed
3 Tablespoons chopped scallions
1 Tablespoon Fish sauce
Salt to taste 
½ Teaspoon Black pepper powder
¾ Cup Water
Oil - as required to shallow fry

Method
Wash and pat dry the fish. Season each side of the fish fillet with salt and pepper. Keep it aside for 10 minutes.
Heat the oil in a frying pan.
Dredge the fish in oats flour and then dip in the beaten egg. Then coat it with corn meal. Make sure that the fish is properly coated.
Fry each side until the color turns light to golden brown. Set aside.
For The Sauce
In a pan heat a tablespoon of oil ( use the same oil that the fish was fried in) sauté garlic, onion for a minute or two then add the tomato and sauté until the tomato softens. Add water and fish sauce, pepper powder, stir well and let boil. Reduce the flame to low and let is simmer for 4 to 5 minutes. In a slow stream, add beaten eggs to pan. Allow to slightly set and then stir into mixture, breaking into pieces. Taste for salt and pepper add if needed according to your taste. To get a smooth sauce I blended this in a mixer jar.
Arrange the fried fish on a serving plate and then top with the sauce. Serve the remaining sauce in a bowl separately.
Serve hot and enjoy!

Labels: Eat the World, Fish, Filipino, Asian Cuisine, Main course


Check out all the wonderful Filipino dishes prepared by fellow Eat the World members and share with #eattheworld. Find out how to join Eat the World here and have fun exploring a country a month in the kitchen with us! 
 Amy’s Cooking Adventures: Pork Siomai 
Sneha’s Recipe: Cardilong Isda -Filipino 
Ginataang Seafood  by Culinary Cam 
Instant Pot Pork Adobo by A Day in the Life on the Farm 

Continue Reading
2 comments
Share:

Kothey Momo With Tomato Dipping Sauce#Foodieextravaganza

There are many varieties of momo / dumplings, one of them that we are going to make today is Kothey momo, these are steamed half-moon shaped dumplings which are pan-fried and served.

These handmade vegetable momo are served with a spicy tomato sauce and make a delicious appetizer or snack!
Kothey Momo is a signature Tibetan/Nepalese dish. It is a half fried and half steamed momo, often elongated in shape. The filling can be either vegetables or meat. They are served with different types of sauces to bring out that tangy pot-sticker flavor.  In traditional Nepalese cooking, Kothey momo are filled with pork or buff meat and these are served with soup.

Makes 9 Momo's
Ingredients
For Momo

1 Cup All Purpose Flour
Hot Water as required
½ Teaspoon Salt

For The Filling
1 Big Bowl Cabbage - chopperized
1 Medium Carrot - chopperized
1 Spring Onion - white and green part finely chopped
1 Teaspoon Sesame Oil
Salt and White Pepper to taste

Method
In a bowl add the flour and salt, keep adding hot water a little at a time with a spoon knead so that all the flour is slightly wet. Then with a your hand knead it into a slightly stiff dough and leave covered for 10 to 15 minutes.

For The Filling
In a pan heat oil add all the veggies and spring onion white part sauté on medium high flame till they are cooked but not mushy. Add salt and pepper to taste and keep aside to cool. Add the spring onion greens and give it a good mix

To Make the Momo
Divide the dough into 9 equal balls. Take each ball and roll into a small disc 3 inch diameter. Fill it with a tablespoons of the filling in the center and start to pleat it by pinching it and pleating it grab the other side and pinch it together. Similarly make the others like wise.
Heat up a pan with a lid. Add a tablespoon of sesame oil and spread it then place the momos and reduce the flame to low.  
Let it cook for 3 minutes when one side is golden/toasted turn the sides and cook on all sides.
When all sides are golden/toasted then make them stand again.
Add ½ cup water
Cover immediately with a lid, on medium low flame, cook for 3 minutes, you will see that the momos start to puff up.
Switch off the flame when the water dries and they are translucent and they are done.

For The Tomato Dipping Sauce
This dipping sauce may look difficult to make ... but believe me it’s not so, it’s super easy and the end result is just too good Do give it a try!

Ingredients
1 Large Tomato
2 Dried Red Chillies
2 Cloves Garlic
½ Inch Piece Ginger
1 Tablespoon Tomato Ketchup
Salt and Sugar to taste

Method
Add the tomato, ginger, garlic and chillies together in a pan with 1/2 cup water and boil till water has dried up and tomatoes have become mushy.
Let it cool and a then give a blitz in a mixer with some salt, sugar and soya sauce as per your taste and your finger licking momo's sauce is ready.
Labels: Momo, Asian Cuisine, Tomato, Dipping Sauce,Vegetarian, Vegan, Street food,Foodie Extravaganza Party
Foodie Extravaganza is where we celebrate obscure food holidays by cooking and baking together with the same ingredient or theme each month. Posting day is always the first Wednesday of each month. If you are a blogger and would like to join our group and blog along with us, come join our Facebook page Foodie Extravaganza. We would love to have you! If you're a spectator looking for delicious tid-bits check out our Foodie Extravaganza Pinterest Board.
    The theme for today's event is "Dumplings"  

Foodie Extravaganza is where we celebrate obscure food holidays by cooking and baking together with the same ingredient or theme each month. Posting day is always the first Wednesday of each month. If you are a blogger and would like to join our group and blog along with us, come join our Facebook page Foodie Extravaganza. We would love to have you! If you're a spectator looking for delicious tid-bits check out our Foodie Extravaganza Pinterest Board

Continue Reading
5 comments
Share:

Keto Beef Mince With Broccoli & Zucchini#Foodieextravaganza

This is a creamy delicious and simple main course dish to prepare. For this recipe you can substitute any Keto approved veggies, this will still taste yummy. Net Carbs per serving is just 7grams.

Serves 2
Ingredients

250 grams Beef Mince
150 Grams Broccoli florets with stalks
150 Grams Zucchini
¼ Cup Onion
2 Teaspoons Minced Garlic
½ Teaspoon Paprika Powder
½ Teaspoon Red Chilli Flakes
½ Teaspoon Fresh Thyme
25 Grams Grated Cheddar Cheese
2 Tablespoons Heavy Cream
25 Grams Cream Cheese
½ Tablespoon Coconut Oil
Salt & Pepper to taste

Method
I have used 80% lean and 20% fat beef mince.
Cut the broccoli florets from the stem and set them aside. Also chop the zucchini into small cubes or slices, however you like them.
Heat the oil in a skillet or non stick pan, add in the beef mince, add a little salt and pepper and then sauté for two minutes, then add in the onions and garlic.  Once the onions turn translucent and the garlic starts to brown add in the paprika, chilli flakes and thyme, give everything a good mix. Cook for a minute before adding the zucchini and the broccoli, season with salt and mix. 
Cover and cook for 4 minutes and then grate the cheddar cheese and add the heavy cream, mix well, cover and cook for another few minutes till the cheese melts. If there is too much stock in the pan cook till that reduces down ( this should be semi dry).
Finally add in the cream cheese and mix everything well. Serve with some fresh parmesan grated on the top and a sprinkling of paprika. 
Enjoy with Low Crab Coconut Flour & Oat Fiber Flatbread!!  
Labels: Foodie Extravaganza Party, Zucchini, Keto, Beef, Broccoli, Mince, Asian Cuisine, Main course, Serves Two
Foodie Extravaganza is where we celebrate obscure food holidays or cook and bake together with the same ingredient or theme each month. If you are a blogger and would like to join our group and blog with us, come join our Facebook page Foodie Extravaganza. We would love to have you! If you're a spectator looking for delicious tid-bits check out our Foodie Extravaganza Pinterest Board.

Posting day for #FoodieExtravaganza is always the first Wednesday of the month.
The theme for this month is "Zucchini"    

Continue Reading
3 comments
Share:

Subak-hwachae/Watermelon Punch - Korean#SundayFunday

This Korean Subak-hwachae/watermelon punch is a popular summer drink. It’s light, refreshing and will quench your thirst for sure! It's a non-alcoholic punch. I have used rose syrup for a little sweetness, you can add sugar according to your taste.

Ingredients 
1 Large Bowl Chopped Watermelon
4 Tablespoons Lemon juice 4 tbsp
4 Tablespoons Sugar or 2 Tablespoons Rose Syrup
2 Pinches Black Salt
Scooped Watermelon - as required for serving
Lemon slice - for garnish
Mint leaves - for garnish
Ice as required

Method
In the blender add watermelon, lemon juice, black salt, sugar and ice. Blend well. Then sieve and pour in the glasses. Now garnish with scooped melon, watermelon, lemon slice and mint leaves. 
Serve chilled!
Labels: Watermelon, Juices, Korea, Asian Cuisine, Sunday Funday
For our event called Sunday Funday, wherein we share recipes our families will love to enjoy on a Sunday. Our theme for Sunday Funday: " Melon".

Continue Reading
2 comments
Share:

Thai Fried Chicken Wings With Red Fiery Sauce#Foodieextravaganza

This sauce is super delicious. Fiery, but it does not burn your mouth. You will love, you'll be licking your fingers for sure.

Serves 4
Ingredients

For The Marination 
9 Chicken Wings With Skin
2 Tablespoons All Purpose Flour
1 Tablespoon Heaped Potato Starch/Corn flour
¼ Teaspoon Heaped Baking powder
1 Teaspoon Sesame seeds
1 Tablespoon Thai Red Curry Paste
1 Teaspoons Lemon juice
1 Small Egg
¼ Teaspoon Salt
½ Teaspoon Chicken powder
1/8 Teaspoon White pepper 
For The Red Fiery Sauce
½ Cup Water
½ Teaspoons Red Pepper Flakes
1 Teaspoon Ketchup
2 Tablespoons Sweet & Sour Sauce
½ Teaspoon Vinegar
1 Teaspoon Sugar
1 Teaspoons Corn flour - dissolved

Method
For Wings Marination
Marinate chicken wings with all the given ingredients for 30 minutes, or overnight in the refrigerator.
Mix the all purpose flour, baking powder, potato starch and sesame seeds well.
Before frying add the egg and the flour mix. Mix well so that the wings are coated with this mixture.
Heat oil in a deep frying pan , place the wings in a single layer (fry them in batches), let them fry on medium low flame for 10 minutes on one side, then turn the sides and let it fry for another 5 minutes . Then fry the next batch of wings. Remove them to when done. Just before serving refry them in hot oil on high flame for just 2 - 3 minutes or till crisp and golden.
For The Red Fiery Sauce 
Mix all given ingredients except the corn flour in a sauce pan, cook till mixture reduce to nearly half. Mix the corn flour in a tablespoon water, add it to the sauce and keep stirring till it thickens.
Serve the fried wings with this Red Fiery Sauce.  
Enjoy!! 
Labels: Thai Red Curry Paste, Thailand, Asian Cuisine, Chicken Wings, Dipping Sauce, Appetizer
Foodie Extravaganza is where we celebrate obscure food holidays or cook and bake together with the same ingredient or theme each month. If you are a blogger and would like to join our group and blog with us, come join our Facebook page Foodie Extravaganza. We would love to have you! If you're a spectator looking for delicious tid-bits check out our Foodie Extravaganza Pinterest Board.

Posting day for #FoodieExtravaganza is always the first Wednesday of the month.
    

Continue Reading
3 comments
Share:

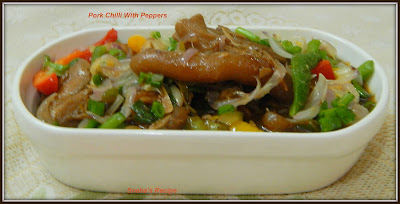
Pork Chilli With Peppers#SundayFunday

Juicy pork slices with hot chillies in every bite, chilli pork can double as a side dish as well as a standalone snack. This is an absolute easy dish to prepare. It is quite versatile and pairs well with any rice or noodles or can be enjoyed as a starter/ appetizer too. This is an easy-to-cook pork recipe with soy sauce. We just love stir fry recipes as they are simple and easy to prepare.

Ingredients
500 Grams Pork - thinly sliced
1 Each Green & Red Capsicum/Bell Peppers - sliced
3 Green Chillies - slit - adjust to taste
4 Medium Onions - sliced
1" Ginger - chopped
10 Cloves Garlic - chopped
Freshly Ground Black Pepper powder to taste
1 Tablespoon Soy sauce
1 Tablespoon Sesame oil
1 Teaspoon Rice Vinegar (or regular white vinegar)
½ Teaspoon Sugar
Oil - as required for frying
3 Tablespoons Chopped Spring Onion Greens - for garnishing
For The Marination
2 Tablespoons Dark Soy sauce
½ Tablespoon Green Chili sauce - adjust to taste)
1 Tablespoon Ginger Garlic paste
Salt to taste
Method
Marinate the pork with salt and all the given ingredients, mix well. Keep aside at least for an hour.
Heat oil in a wide heavy bottomed pan or skillet and fry the slit green chillies, chopped ginger and garlic lightly and then add the marinated pork slices and fry till golden brown on both sides. Add about a cup of water and cook covered on a medium flame till the pork is tender.
In another pan heat oil stir fry the onions, capsicums on medium heat till they soften for about 2 -3 minutes. Remove and keep aside.
When the pork is cooked add the remaining soy sauce, chili sauce if required, sugar, sesame oil, pepper powder, vinegar and mix well. Add the softened onions and capsicum, mix and cook on a medium high flame for just a minute.
Turn off the flame, garnish with spring onion greens and serve along with fried rice or noodles.
Enjoy!!
Labels: Pork, Chinese, Asian Cuisine, Side Dish, Main course, Starters, Sunday Funday, Stir Fry

For our event called Sunday Funday, wherein we share recipes our families will love to enjoy on a Sunday. Our host for this week's event is Sue of Palatable Pastime and the theme is Chinese New Year , January 2022.  

Continue Reading
3 comments
Share:

Vegetarian Omurice /Japanese Fried Rice Omelette#EattheWorld

Omurice, it's a Japanese invention that combines an omelette with fried rice. You'll often hear it referred to as omuraisu, omumeshi or omuretsu" and "raisu," the Japanese pronunciations of "omelette" and "rice" Some versions have the rice rolled up in the omelette
I'm also sharing here, a traditional Capsicum Ketchup, since it's easy and tasty, while the recipe calls for Okonomiyaki Sauce.
Japanese Omurice is made with chicken, but Koreans commonly use beef, pork or ham as well. Shrimp is another good option.
I have used vegetables, like carrot, onion, and scallion. You can also add  celery, zucchini, or mushrooms. 

I used 2 eggs per serving for this recipe, but you can use 3 if you want a thick omelette covering your rice. You can also add a little bit of heavy cream or milk for a softer omelette, but I didn’t include it in this recipe. This is an easy fried rice flavored with sweet, tangy ketchup and wrapped in an egg omelette.
Serves 2
Ingredients

1 Medium Onion - finely chopped
1 Scallion - finely chopped
1 Small Carrot - finely chopped
½ Teaspoon Black pepper powder
1 Tablespoon Soy sauce
3 Tablespoons Capsicum Ketchup - recipe below
½ Teaspoon Salt
2 Tablespoons Oil or as required for pan frying
2 Cups Heaped Cooked Cold Rice -
4 Eggs
To Make the Kewpie Mayonnaise
1 Cup Mayonnaise
¼ Teaspoon Garlic powder
2 Teaspoons Tomato Ketchup

Method
Prepare the fried rice ingredients by finely chopping all the veggies.
Heat a large skillet over medium high heat f oil. Add the onion, scallion, carrot and stir fry until the onion turns soft. Stir in soy sauce, salt and pepper to taste.

Reduce the heat to medium. Add the rice, and stir well until the clumped up rice is broken up and all the ingredients are well combined. Add capsicum ketchup (adjust to taste), salt and pepper to taste, continue to stir until the ketchup is evenly incorporated into the fried rice. Keep this aside.  

Heat a lightly oiled small non-stick pan over medium low heat.

Crack and beat 2 eggs in a bowl with a spoon or a fork. Stir in a pinch of salt. Add the egg mixture to the pan and swirl it around to cover the pan.

When the bottom is set but the top is still runny, turn off the heat and add one serving of the fried rice in the middle of the egg omelette.  Using a spatula, fold both sides of the omelette over the rice. Push the whole Omurice to the side of the pan.
Flip it onto a plate. Top it off with a squeeze of ketchup or Kewpie mayo. It's ready to enjoy.

Capsicum Ketchup
Ingredients
1 Tablespoon Olive Oil
1 Medium Onion - finely chopped
1 Large Red Capsicum - roasted
200Ml Tomato Puree
4 Ripe Tomatoes - chopped
¼ Cup Apple Cider Vinegar
1 Stalk Celery - chopped
1" Piece Ginger - chopped
4 Cloves Garlic - chopped
¼ Cup Dark Brown Sugar
2 Teaspoons Honey
1 Teaspoon Salt
½ Teaspoon Coriander powder
¼ Teaspoon Nutmeg Powder
¼ Teaspoon White Pepper

Method
Roast the capsicum in a preheated oven at 180°C for 15 minutes or until the skin start to blacken or on the gas flame. Wrap the capsicum, in aluminum foil, fold over the edges to seal and trapped steam which will help loosen the skin from the capsicum. Once cooled, peel the skin off, de seed it and roughly chop them.
Add the olive oil to a pan and sauté the onions, celery, ginger, and garlic until they are just starting to turn brown around the edges. Add the capsicum, dark brown sugar. Cook, stirring until the sugar has melted. Add the chopped tomato, vinegar, tomato puree and salt, Gently simmer over low heat, stirring regularly. Once the softens and the sauce starts to thicken, switch off the flame. Allow the mixture to cool. 
Add the cooled mixture to a food processor or blender and process until smooth. 
I wanted the ketchup smooth, so passed the blended mixture through a fine sieve and discarded the solids. Now add the sauce back into the pan, add in the honey, coriander, nutmeg and white pepper powder. Give this a good mix and bring this to a boil, reduce the flame and it simmer till it form a thick sauce consistency, switch off the flame, cool. 
Capsicum Ketchup is ready.
You can freeze the remaining in an airtight container for 2 - 3 months.

My Notes
If the rice is a bit too hard after being in the fridge, heat it up in the microwave to soften it a little.
You can also shape the Omurice by hand using aluminum foil or a paper towel. Drizzle some ketchup on top. Repeat the last 3 steps for another serving.
Labels: Omurice, Japanese, Asian Cuisine, Vegetarian, Egg, Kwepie, Mayonnaise, Capsicum, Ketchup, Homemade, Eat the World
                   
Each month a group of us join Evelyne of CulturEatz as she travels to different countries to Eat the World. This month it's secret Santa wherein we can choose any dish by the blog assigned to us.  
Check out all the wonderful Japanese dishes prepared by fellow Eat the World members and share with #eattheworld. Click here to find out how to join and have fun exploring a country a month in the kitchen with us! 
 Amy’s Cooking Adventures: Yoshinoya Beef Bowl (Gyudon) 
A Day in the Life on the Farm: Japanese Rice 
Pandemonium Noshery: Ginger Pork Stir Fry 

Continue Reading
3 comments
Share: