Showing posts with label Foodie Extravaganza Party. Show all posts

Thai Fried Chicken Wings With Red Fiery Sauce#Foodieextravaganza

This sauce is super delicious. Fiery, but it does not burn your mouth. You will love, you'll be licking your fingers for sure.

Serves 4
Ingredients

For The Marination 
9 Chicken Wings With Skin
2 Tablespoons All Purpose Flour
1 Tablespoon Heaped Potato Starch/Corn flour
¼ Teaspoon Heaped Baking powder
1 Teaspoon Sesame seeds
1 Tablespoon Thai Red Curry Paste
1 Teaspoons Lemon juice
1 Small Egg
¼ Teaspoon Salt
½ Teaspoon Chicken powder
1/8 Teaspoon White pepper 
For The Red Fiery Sauce
½ Cup Water
½ Teaspoons Red Pepper Flakes
1 Teaspoon Ketchup
2 Tablespoons Sweet & Sour Sauce
½ Teaspoon Vinegar
1 Teaspoon Sugar
1 Teaspoons Corn flour - dissolved

Method
For Wings Marination
Marinate chicken wings with all the given ingredients for 30 minutes, or overnight in the refrigerator.
Mix the all purpose flour, baking powder, potato starch and sesame seeds well.
Before frying add the egg and the flour mix. Mix well so that the wings are coated with this mixture.
Heat oil in a deep frying pan , place the wings in a single layer (fry them in batches), let them fry on medium low flame for 10 minutes on one side, then turn the sides and let it fry for another 5 minutes . Then fry the next batch of wings. Remove them to when done. Just before serving refry them in hot oil on high flame for just 2 - 3 minutes or till crisp and golden.
For The Red Fiery Sauce 
Mix all given ingredients except the corn flour in a sauce pan, cook till mixture reduce to nearly half. Mix the corn flour in a tablespoon water, add it to the sauce and keep stirring till it thickens.
Serve the fried wings with this Red Fiery Sauce.  
Enjoy!! 
Labels: Thai Red Curry Paste, Thailand, Asian Cuisine, Chicken Wings, Dipping Sauce, Appetizer
Foodie Extravaganza is where we celebrate obscure food holidays or cook and bake together with the same ingredient or theme each month. If you are a blogger and would like to join our group and blog with us, come join our Facebook page Foodie Extravaganza. We would love to have you! If you're a spectator looking for delicious tid-bits check out our Foodie Extravaganza Pinterest Board.

Posting day for #FoodieExtravaganza is always the first Wednesday of the month.
    

Continue Reading
3 comments
Share:

Mango & Cucumber Salad#Foodieextravaganza

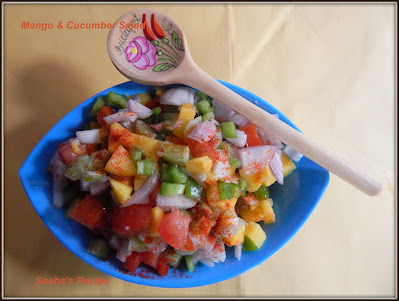
This Mango Cucumber Salad, it’s sweet and crunchy, with a hint of spice, light and refreshing. Mango is a sweet tropical summer fruit can now be part of your dinner too!
.
Serves 4
Ingredients
  
2 Firm & Ripe Mangoes diced
1 Large Cucumber diced
1 Medium Onion - diced
1 Medium Capsicum/ Green pepper - diced
1 Tablespoon Lime Jucie
1 Teaspoon White Vinegar
1 Teaspoon Red Chilly Powder


Method  
Combine mangoes, cucumber, red onion, and green pepper in a large bowl. Add the lime juice, to the the salad. Add vinegar and red chilly powder. Toss to combine. Serve it in a bowl with a sprinkle of chilly powder. Refrigerate and allow to marinate for an hour before serving. 
Enjoy this chilled salad!!

My Notes
Be sure mangoes are ripe. They will be soft to the touch and fragrant.  
Labels: Foodie Extravaganza Party, Mango, Cucumber, Salad, Healthy
Foodie Extravaganza is where we celebrate obscure food holidays or cook and bake together with the same ingredient or theme each month. If you are a blogger and would like to join our group and blog with us, come join our Facebook page Foodie Extravaganza. We would love to have you! If you're a spectator looking for delicious tid-bits check out our Foodie Extravaganza Pinterest Board.

Posting day for #FoodieExtravaganza is always the first Wednesday of the month.  

Continue Reading
2 comments
Share:

Han’s “Dice”-d Potatoes - Recipe Inspired by : A Star Wars Story#Foodieextravaganza

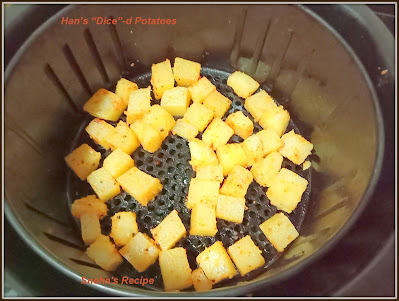
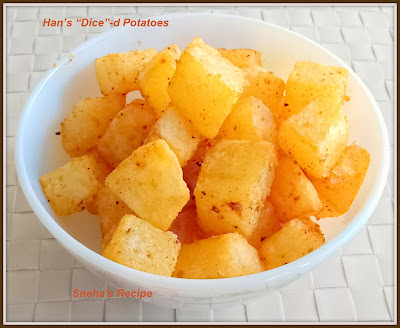
Han’s “Dice”-d Potatoes were inspired by Han’s lucky dice. Not only are they themed but they are also an easy, delicious, a healthier replacement for traditional French fries and the best part it that these are not fried at all! These can be perfectly paired with Millennium Falcon Burgers!
Han's later while escaping his home world of Corellia, gave the pair of dice to Qi'ra as a symbol of good luck, only for her to be captured by Moloch, taking the pair of dice with her.

Ingredients
2 Medium Potatoes - cut into large cubes/ diced
2 Tablespoons Olive Oil
½ Teaspoon Homemade Garlic Salt
1/8 Teaspoon Onion Powder
1/8 Teaspoon Paprika Powder
½ Teaspoon Black Pepper Powder 
½ Teaspoon Sugar  
Method 
Bring a large saucepan of water to a boil with ½ teaspoon salt .
Add diced potato cubes.
Cook for until just fork tender. (Do not overcook them)
Drain and allow to cool slightly.
In a large bowl, add potatoes, oil, and rest of the seasonings, toss them well to coat in the seasonings.
Spray a air fryer grill basket with cooking spray.
Add potatoes to grill basket.
Cook at 200°C for 10 - 12 minutes. Then , shake the basket to , tossing occasionally so they don’t burn after every 5 minutes. 
Let them continue to cook until golden brown and crispy.
Taste for salt, sprinkle a dash if necessary, on the potatoes and serve with Millennium Falcon Burgers.
Labels: Foodie Extravaganza Party, Potato, Side Dish, Air Fryer, Homemade, Garlic Salt
Foodie Extravaganza is where we celebrate obscure food holidays or cook and bake together with the same ingredient or theme each month. If you are a blogger and would like to join our group and blog with us, come join our Facebook page Foodie Extravaganza. We would love to have you! If you're a spectator looking for delicious tid-bits check out our Foodie Extravaganza Pinterest Board.

Posting day for #FoodieExtravaganza is always the first Wednesday of the month.    

Continue Reading
5 comments
Share:

Corn & Peas Pulao With Beer Chicken Tandoori#Foodieextravaganza

This is a complete meal, you will love the flavor of the beer in the tandoori chicken. 

1 Cup = 200 Ml Cup Measurement
Serves 2
Ingredients
To Marinate The Chicken

400 Grams Boneless Chicken - cut into 2" cubes
1 Teaspoon Heaped Ginger Garlic paste
¼ Teaspoon Heaped Salt
1 Tablespoon Homemade Tandoori Masala
2 Tablespoons Hung Curd
1 Tablespoon Heaped Mustard Oil
1 Teaspoon HP Sauce
¼ Cup Ale Beer
Ingredients For The Rice
1 Cup Basmati Rice 
1 Small Onion - chopped
½ Tablespoon Ginger juliennes
3 Green Chilies - diagonally sliced
¼ Cup Boiled Sweet Corn
¼ Cup Boiled Peas
¼ Cup Colored Bell peppers
1 Tablespoon Lemon juice
1 Spring onions - finely - chopped - optional
½ Tablespoon Vegetable Stock powder
¼ Teaspoon Black Pepper powder
¼ Teaspoon Salt or to taste
2 Tablespoons Heaped Oil
1 Tablespoons Coriander leaves chopped
For The Kachumber / Salad
1 Onions - chopped
1 Tomato - chopped
1 Cucumber - chopped
5 - 6 Leaves Butter Head Lettuce
Salt & Black pepper powder to taste
A Sprinkle of Vinegar to taste

Method
Boil the rice in water and salt to taste till 90% done. Drain the rice. When cooled refrigerate the rice ( since the rice should cold) then the rice remains firm and grainy.
Marinate chicken cubes with all the given ingredients, leave it for 30 minutes or overnight for best results, put on skewers, and grill in 2 tablespoons oil until chicken tender. 
It's flavor is simply divine.
To Make The Rice
Heat oil, add chopped onion, fry till transparent, add ginger, green chilies, chicken powder, lemon juice, boiled peas, sweet corn and add in the boiled rice, black pepper powder with ½ cup water lightly give it good mix, taste for salt and add accordingly, mix well. Cover and leave it on dum for 10 minutes on low flame, remove in a platter, top with tandoori chicken skewers, the oil and gravy from the pan pour it over the chicken to moisten it. 
Garnish with chopped coriander leaves.
For The Kachumber/Salad
This is a lovely salad or kachumber mix all onions, tomatoes and cucumber seasoned with salt, pepper and a sprinkling of vinegar, done! 
Enjoy the complete meal !! 
Labels: Foodie Extravaganza Party, Serves Two, Corn, Pulao, Rice, Beer, Chicken, Salads, Vegetarian, Main course
Foodie Extravaganza is where we celebrate obscure food holidays or cook and bake together with the same ingredient or theme each month. If you are a blogger and would like to join our group and blog with us, come join our Facebook page Foodie Extravaganza. We would love to have you! If you're a spectator looking for delicious tid-bits check out our Foodie Extravaganza Pinterest Board

Posting day for #FoodieExtravaganza is always the first Wednesday of the month. This month our theme is in honor of St. Patrick's day. Since April 6th is celeberated as New Beer's Event , we are posting recipe for the same. 

Continue Reading
2 comments
Share:

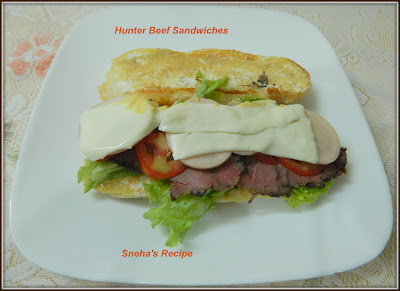
Hunter Beef Sandwiches#Foodieextravaganza

These Beef Sandwiches are incredibly delicious and filling. A perfect meal to carry for your office lunch or kids school lunch box. You can cut up beef roast in smaller portions, repackaged it and send this as a gift to your loved ones or carry them for a party. 
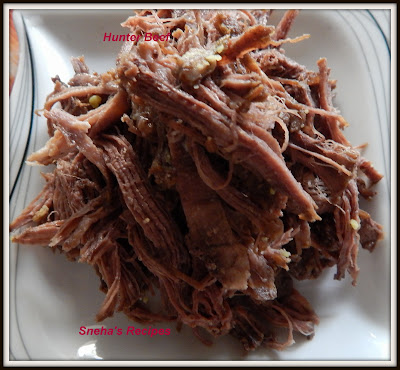
For the recipe  the Hunter Beef Roast check the recipe here.

Ingredients
Hunter Beef  - sliced / shredded
Cheese slices - as required
Mayonnaise - as required
Dijon Mustard - as required
Romaine Lettuce - as required
Pickled Radish Slices - as required
Tomato Slices - as required
Butter as required to Toast
Hot Dog Buns/Bread Slices

Method
Slice the Hunter Beef thinly or shred it whatever way you wish. I have made burger's as well as sandwiches with this.

For the shredded Hunter Beef sandwiches 
I, shredded the beef and then buttered the slices , topped it shredded hunter beef and enjoyed.
For the Hot Dog Buns
Applied butter to the hot dog buns then toasted it, slathered it with mayo then Dijon mustard, then placed a lettuce leaf, arranged the hunter beef slices, tomato slices and pickled radish on top, placed a slices of cheese, closed the buns.
Serve and enjoy!! 
Labels: Foodie Extravaganza Party ,Beef, Sandwiches, Burgers, Kids delight, Snacks

Foodie Extravaganza is where we celebrate obscure food holidays or cook and bake together with the same ingredient or theme each month. If you are a blogger and would like to join our group and blog with us, come join our Facebook page Foodie Extravaganza. We would love to have you! If you're a spectator looking for delicious tid-bits check out our Foodie Extravaganza Pinterest Board

Posting day for #FoodieExtravaganza is always the first Wednesday of the month. This month our theme is in honor of St. Patrick's day. We are posting recipes for ways to use up Leftover Corned Beef

Continue Reading
4 comments
Share:

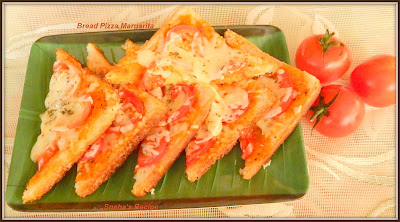
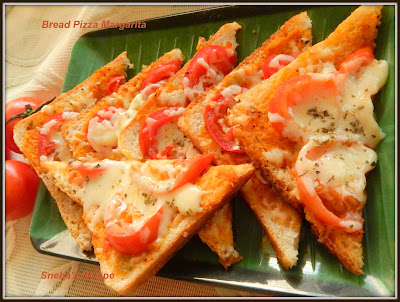
Bread Pizza Margarita#Foodieextravaganza

Quick and Easy Slice Bread Slice Margherita Pizza is probably one of the easiest recipes you can make for breakfast, a light and quick dinner or as a evening snack. Made these bread pizzas for the physically challenged children who I, spend time with pretty often. They were so thrilled to make these. In batches of 4 each , each batch was given do one task. One batch applies the butter, the other sauce, the next will grate the cheese on it and then last batch of children will garnish arrange the olives.
When these were ready and each one was served in a paper plate along with a glass of juice, they were so thrilled to eat what they had made. Seeing the smiling and joyful faces, taking a second and third helping, gives me immense satisfaction, joy, to be and spend time with them.
Here the recipe is of a small quantity, but for 30 children I, made in large quantity.. used three medium packs of brown bread, 650 grams of pizza sauce and nearly a kg of mozzarella / pizza cheese and pics are of all the remaining that I could take. I am sure these mini bread pizzas, will be loved by you, especially the kids.  
If you are craving for pizza and don't have time to prepare the dough and then this is best solution. Easy, quick and really, really delicious. It takes no more than 15 or 20 minutes, you can also choose your favorite pizza toppings or with, ingredients you have in house. Can make many other variations according to your tastes and it's done, ready to be served.  
The recipe here is one simple option You can add various vegetables like peppers, onion, garlic, olives or meat like ham, prosciutto, tuna, pepperoni even other type of cheese. You can never get bored with this dish.
Give it a try I am sure you and your kids will love these. The 
Ingredients
6 Bread slices
1/3 to 1/2 Cup Pizza Sauce
1/2 Cup Mozzarella Cheese - grated
1 Teaspoon Dried Oregano
5-6 fresh basil leaves, chopped
Sliced Green or Black Olives - as required

Method
Preheat oven to 200°C with both the elements on.
Butter both the sides of the bread lightly. Arrange bread slices on a baking tray lined with parchment paper.
Spread pizza sauce on each slice of bread. Sprinkle dry oregano, and grated cheese. Top it with sliced black or green olives and chopped basil leaves (by the time I could make these for pics all the olives were over).
Bake for 10 minutes or until the cheese melts. Serve immediately. 
Labels: Foodie Extravaganza Party, Appetizer, Party pleasers, Snack, Pizzas, Bread Slices, Mozzarella Cheese, Pizza Sauce, Olives
    Foodie Extravaganza Party - February 2022

Continue Reading
4 comments
Share:

Pull Me Up Cake#Foodieextravaganza

Pull Me Up Cake is also famously known as a Tsunami cake. The pulling of the sheet and chocolate falling upon the cake in slow motion makes you want to dig into it instantly. The fascination is all about the tickle and tumbles effect of frosting over the cake. 
That’s the reason my hubby wanted this cake, he is a chocolate lover. Which chocolate lover wouldn't want to have a pull me up cake for a birthday celebration. This cake made him so happy and it's vegan, used non dairy whipping cream.

Ingredients 
For the Cake Batter
1½ Cup All purpose Flour
¼ Cup Dark Cocoa powder
1 Teaspoon Baking powder
1 Teaspoon Baking soda
1 Cup Water - Lightly warm ( or a tablespoon or two more)
½ Cup Vegetable oil
¾ Cup Caster Sugar
½ Teaspoon Vanilla powder
For Moistening The Cake / Simple Syrup
¼ ​Cup Sugar 2 Tablespoon Water
For The Cream Filling
¾ Cup Whipping Cream - whip till stiff peaks
For the Lava/Ganache
250 Grams Dark Chocolate - chop finely
250 Ml Whipping Cream 
½ ​Cup Milk - I have used soy milk
Method
Grease and line the bottom of a 5" tall round cake tin and dust the pan with flour. Keep the pan aside.
Sieve all the dry ingredients. In a bowl add the water oil and sugar, whisk well, till the sugar is melted , then add in the the dry ingredients in batches, alternating with the water , whisking it lightly with a whisk so that no lumps are formed, till all the flour and water is incorporated. The batter should be ribbon consistency. Pour the batter in the prepared cake pan. Bake it in a pre heated oven at 170°C for 30 - 35 minutes or till a skewers comes out clean. Cool the cake overnight.
The next day un mold the cake and remove the parchment paper and cut it into three layers.
For the Simple Syrup
Add the sugar and water in a sauce. Mix it well at low heat. Make a slurry that is not too thick nor too runny. You will need to cook it for at least 4 - 5 minutes or till the sugar is completely melted .

For the Lava/Ganache
Heat cream and milk stirring on medium heat till it starts to scald take off flame, add the chocolate and mix well till it melts. Let it cool it will thicken.
Moisten the first layer of the  cake with simple syrup.
Fill a piping bag with whipped cream. Place one layer and drench it with simple syrup then 
pipe it on the cake one centimeter away from the edge with whipped cream then place second layer on the top part and again pipe it with whipped cream, 
now place the third cake layer and on that do not add cream. Now lift the cake into a deep edge platter. 
Tent the cake all round with a acetate sheet / transparent plastic sheet and create a boundary/wall around the cake. Basically, the sheet should cover or enclose the cake properly/tightly. Seal the edges with tape.
Slightly warm the lava and pour over the cake inside the sheet. Do it slowly and gradually. 
Pull the sheet up and tada-tada!!! Your pull up cake fantasy/tsunami cake sweetly comes true!!
Dust it with cocoa powder.
Enjoy!!

Labels: Eggless, Healthy, Foodie Extravaganza Party, Cakes, Chocolate, Whipping Cream, Birthday cake, Pull Me Up, Vegan

Foodie Extravaganza Party - January 2022
Food Lust People Love: ​​Cheesy Creamed Leeks 
Karen's Kitchen Stories: Chocolate Truffle Cakes with Cappuccino Whipped Cream
Palatable Pastime: Havarti, Egg & Dill Breakfast Quiche
Faith, Hope, Love & Luck Survive Despite a Whiskered Accomplice: Oven-Baked Au Gratin Potatoes in a Pie Dish
Sneha's Recipe: Pull Me Up Cake
A Day in the Life on the Farm: Raspberry Parfait
Pandemonium Noshery : Vintage Icebox Cake

Continue Reading
3 comments
Share: