Gluten-Free Quinoa Fusilli Pasta Ring#SundayFunday

This is a healthy pasta, quinoa pasta it's gluten free and delicious. I have noticed that when you normally cook pasta after cooling it clumps up, so requires to be oiled immediately. But that's not the case in this quinoa pasta it does not require oil after draining since it does not clump up after cooling. Loved the taste of this pasta.

Ingredients
2 Cups Gluten Free Quinoa pasta
1/3 Cup Chopped Carrot
1/3 Cup Chopped French Beans
1/3 Cup Parboiled Broccoli
1/3 Cup Boiled Shredded Chicken
1 Medium Onion - chopped
3 Big Cloves Garlic - finely chopped
2 Tablespoons Olive Oil
3 Tablespoon Pasta Sauce
¾ Cup Grated Cheddar Cheese
1/3 Cup Half & Half
2 Large Eggs
Salt to taste
A Dash of Black Pepper Powder
½ Teaspoon Paprika powder

Method
Boil the Gluten free quinoa pasta till 80% done.
Strain the quinoa pasta and run through cold water.
In a pan, heat oil, add the onions and garlic sauté till raw aroma of the garlic vanishes, add the chopped beans and carrot sauté for a minute. Cover and cook till the carrots are half done. Then add the pasta sauce and paprika powder, sauté for a minute or two. Add the broccoli, shredded chicken and pasta. Stir to combine, add the salt and give it a good mix. Keep aside to cool.
In a large mixing bowl add in eggs, half and half, pepper and salt whisk to combine well, add in the cooled pasta mixture and mix well till combined. Now add in 1/3 cup cheese and mix.
Grease a ring mold well with butter, sprinkle a little or the remaining cheese at the bottom. Press in the pasta mixture well, add the remaining cheese on the top. Tent the pan with a foil.
Bake in a preheated oven at 180°C for 20 minutes. After 20 minutes remove the foil and bake again for another 20 minutes or till a skewer inserted comes out clean.
Cool it for 10 minutes. Unmold and serve.
Delicious meal is ready!! Serve warm. 
Labels: Gluten free, Pasta & Noodles, Bundt, Quinoa, Egg, Chicken, Sunday Funday, Baked, Main course

Sunday Funday  - Noodle Ring Day

Continue Reading
2 comments
Share:

Cardilong Isda -Filipino#EatTheWorld

Cardilong Isda is a dish made of fried fish cooked or served with a sauce made of sautéed tomatoes, onions and beaten eggs.. I have made this gluten free by using oat's flour and coating it in cornmeal to make the fish crispy and it get's a crunchy texture. I just topped the sauce over the fried fish.

Ingredients
1 Whole Fish - I used Pomfret/Pompano
¼ Cup Oats Flour
¾ Cup Cornmeal
1 + 1 Eggs - beaten (1 for frying and 1 for sauce)
2 Medium Tomatoes - diced
1 Medium Onion- diced
3 Cloves Garlic - crushed
3 Tablespoons chopped scallions
1 Tablespoon Fish sauce
Salt to taste 
½ Teaspoon Black pepper powder
¾ Cup Water
Oil - as required to shallow fry

Method
Wash and pat dry the fish. Season each side of the fish fillet with salt and pepper. Keep it aside for 10 minutes.
Heat the oil in a frying pan.
Dredge the fish in oats flour and then dip in the beaten egg. Then coat it with corn meal. Make sure that the fish is properly coated.
Fry each side until the color turns light to golden brown. Set aside.
For The Sauce
In a pan heat a tablespoon of oil ( use the same oil that the fish was fried in) sauté garlic, onion for a minute or two then add the tomato and sauté until the tomato softens. Add water and fish sauce, pepper powder, stir well and let boil. Reduce the flame to low and let is simmer for 4 to 5 minutes. In a slow stream, add beaten eggs to pan. Allow to slightly set and then stir into mixture, breaking into pieces. Taste for salt and pepper add if needed according to your taste. To get a smooth sauce I blended this in a mixer jar.
Arrange the fried fish on a serving plate and then top with the sauce. Serve the remaining sauce in a bowl separately.
Serve hot and enjoy!

Labels: Eat the World, Fish, Filipino, Asian Cuisine, Main course


Check out all the wonderful Filipino dishes prepared by fellow Eat the World members and share with #eattheworld. Find out how to join Eat the World here and have fun exploring a country a month in the kitchen with us! 
 Amy’s Cooking Adventures: Pork Siomai 
Sneha’s Recipe: Cardilong Isda -Filipino 
Ginataang Seafood  by Culinary Cam 
Instant Pot Pork Adobo by A Day in the Life on the Farm 

Continue Reading
2 comments
Share:

Colorful Peppers Pulao#Improv

Colorful Peppers Pulao is an easy, quick and delicious one-pot meal rice made with 3 different bell peppers/capsicum, aromatics and herbs. The best thing about this recipe is that you can use leftover rice too. Perfect for lunch box or kid's tiffin.
Ingredients
½ Each of Red, Yellow, Orange & Green Bell Peppers
½ medium sized Red/ purple Onion
3 Green Chilies - thinly sliced
1 Teaspoon Urad Dal
1 Tablespoon Homemade Curry Powder
1½ Cups  Rice 
2-3 Tablespoons Oil 
2½ Cups Water

Method  
Dice into little cubes all the colored bell peppers
Heat a frying pan with a tablespoon of oil and sauté the peppers, sliced green chillies and with a pinch salt, and a teaspoon of curry powder. Remove and keep aside.

In the same pressure cooker heat 2 tablespoons of oil, add the urad dal, when it starts to brown add in the rice and sauté it for a minute lightly stirring it or else the rice will break. Then add in the curry powder and sauté again for a minute, add salt to taste and give a good mix. Add in the water and bring this to a rolling boil. Close the cooker and take 2 whistles on high flame. After 2 whistles switch off the flame. 
Let the pressure release on it's own. Open the cooker and stir in the sautéed bell peppers and green chillies lightly fluff the rice with a fork so that the bell pepper as incorporated and the rice is loosen nicely. Serve warm, garnished with chopped coriander leaves.
Enjoy this simple yet completely healthy and wholesome one pot meal! 
Labels: Colored Bell Peppers, Capsicum, Pulao, Pressure Cooker, Vegetarian, Vegan, Gluten free, Improv Cooking Challenge, Main course, Curry powder, Homemade
December Improv Cooking Challenge

Continue Reading
No comments
Share:

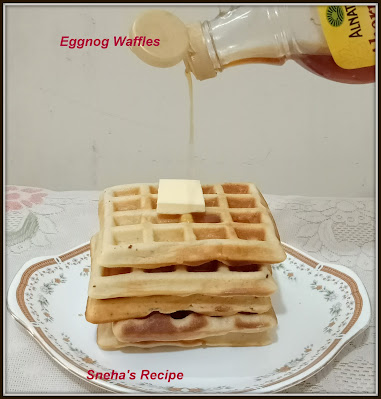
Eggnog Waffles#Foodieextravaganza

These are classic waffles,  which come together for a quick and easy morning breakfast, creamy eggnog with cinnamon and nutmeg spice is a prefect combo flavor.

Makes 8 Waffles
Ingredients

2 Cups All Purpose Flour
1 Tablespoon Sugar
1 Tablespoon Baking powder
¼ Teaspoon Salt
¼ Teaspoon Nutmeg powder
¼ Teaspoon Cinnamon powder
2 Eggs
2 Cups Eggnog - I used my Homemade Eggnog
¼ Cup Vegetable Oil
1 Teaspoon Vanilla extract

Method
Preheat your waffle iron.
In a medium bowl combine the flour, sugar, baking powder, salt, nutmeg and cinnamon. Whisk to blend.
In the bowl of a stand mixer/food processor, combine the eggs and the eggnog and blend until smooth. Add in the dry ingredients until just combined. Add in the oil and vanilla. Make a smooth batter.
Cook waffles according to your waffle maker's directions until they are golden brown and cooked through.
Serve with maple syrup and a cube of butter. 
Labels: Breakfast, Egg, Eggnog, Foodie Extravaganza Party, Healthy, Juices, Milk, Non-Alcoholic
Event for Foodie Extravaganza , for this month the theme is "Eggnog ". Take a look at the other recipes.  

Continue Reading
3 comments
Share:

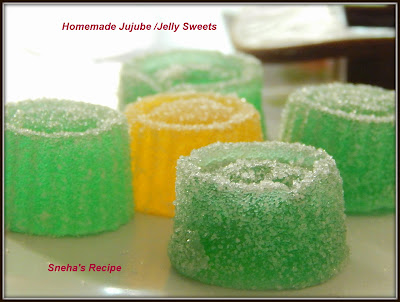
Homemade Jujube /Jelly Sweets#SundayFunday

Jujube or Jube, is the name of jelly candy or gummy sweets. Jujube's are sweet in taste, colorful, made with different flavors using the corresponding essences, like orange color and orange essence. Jujubes are light and melt in the mouth. These have a shelf life of a month or more.
Ingredients
4 Oz Citrus Juice - see notes
5 Pouches Unflavored Gelatin - see notes
5 Oz Water
500 Grams Granulated Sugar
Color & Essence - of your choice

Method
Most important
- keep the well oiled tray's with a drop of color and essence ready.

Soak Gelatin in the citrus juice.
In a heavy bottomed pan add the water and water and keep this on medium flame stirring till the sugar dissolves. Once the sugar dissolves add the soaked gelatin, increase the flame to high and with a wooden spatula stir it continuously breaking the lumps of the gelatin for exactly 4 minutes ( set a timer). Once 4 minutes are up. Switch off the flame.
Divide this into the oiled trays accordingly, remove the layer of scum from top so that you get clear jelly sweets/candy.
Let this set covered with a lid taking care that it does not tough the candy layer. Keep it over night on your counter top. Do not refrigerate this.
Then next morning. Take a cutting board and spread a generous layer of caster sugar on top. Then loosen the sides of the tray with a well oiled knife. Unmold on to the caster sugar and cut into desired size and shape of your choice. 
I have also set them in silicone molds that are well oiled. These too keep overnight to set.
Take a bowl filled with caster sugar as required for coating the jujube's.
Once you cut the desired shape that immediately place them into the bowl of caster sugar and roll them well so that the are well coated with caster sugar. Shake them afterwards in a colander to remove any excess sugar coating.
Store them in a airtight container for a month or more.
Kid's and adults too love these candies, do try them.

My Notes
One pouch of gelatin is 10 grams. So you require 50 grams unflavored gelatin.
For the Citrus Juice - Use one Large orange and one large lemon to extract the juice.
Add the gelatin as soon as the sugar melts, do not bring the sugar syrup to a boil.
Set a timer once you add the gelatin to the sugar syrup and increase the flame to high.
I have used pizza cutter to cut the candy.
Labels: Jelly Sweets, Candy, Gelatin, Christmas Sweet, Sunday Funday, Homemade, Kids delight 

Continue Reading
1 comment
Share: