Keto Beef Mince With Broccoli & Zucchini#Foodieextravaganza

This is a creamy delicious and simple main course dish to prepare. For this recipe you can substitute any Keto approved veggies, this will still taste yummy. Net Carbs per serving is just 7grams.

Serves 2
Ingredients

250 grams Beef Mince
150 Grams Broccoli florets with stalks
150 Grams Zucchini
¼ Cup Onion
2 Teaspoons Minced Garlic
½ Teaspoon Paprika Powder
½ Teaspoon Red Chilli Flakes
½ Teaspoon Fresh Thyme
25 Grams Grated Cheddar Cheese
2 Tablespoons Heavy Cream
25 Grams Cream Cheese
½ Tablespoon Coconut Oil
Salt & Pepper to taste

Method
I have used 80% lean and 20% fat beef mince.
Cut the broccoli florets from the stem and set them aside. Also chop the zucchini into small cubes or slices, however you like them.
Heat the oil in a skillet or non stick pan, add in the beef mince, add a little salt and pepper and then sauté for two minutes, then add in the onions and garlic.  Once the onions turn translucent and the garlic starts to brown add in the paprika, chilli flakes and thyme, give everything a good mix. Cook for a minute before adding the zucchini and the broccoli, season with salt and mix. 
Cover and cook for 4 minutes and then grate the cheddar cheese and add the heavy cream, mix well, cover and cook for another few minutes till the cheese melts. If there is too much stock in the pan cook till that reduces down ( this should be semi dry).
Finally add in the cream cheese and mix everything well. Serve with some fresh parmesan grated on the top and a sprinkling of paprika. 
Enjoy with Low Crab Coconut Flour & Oat Fiber Flatbread!!  
Labels: Foodie Extravaganza Party, Zucchini, Keto, Beef, Broccoli, Mince, Asian Cuisine, Main course, Serves Two
Foodie Extravaganza is where we celebrate obscure food holidays or cook and bake together with the same ingredient or theme each month. If you are a blogger and would like to join our group and blog with us, come join our Facebook page Foodie Extravaganza. We would love to have you! If you're a spectator looking for delicious tid-bits check out our Foodie Extravaganza Pinterest Board.

Posting day for #FoodieExtravaganza is always the first Wednesday of the month.
The theme for this month is "Zucchini"    

Continue Reading
3 comments
Share:

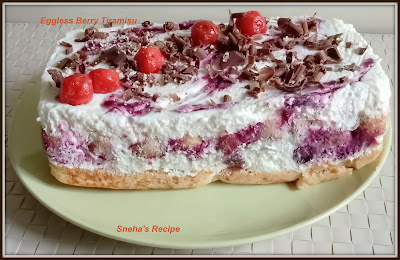
Eggless Berry Tiramisu#SundayFunday

This Eggless Berry Tiramisu is a no bake dessert, is a rich creamy filling, light, has no raw eggs, this eggless tiramisu will be a hit with your friends and family. It's a perfect when you want a quick, make-ahead, indulgent dessert for potlucks or larger gatherings.
Tiramisu is a classic Italian dessert that literally translates to pick-me-up. This eggless tiramisu has no coffee. Sponge biscuits / lady fingers, also known as Savoiardi, sponge fingers make up the structural part of this eggless berry tiramisu.

Ingredients
300 Ml Heavy Whipping Cream
⅓ Cup Caster Sugar
300 Grams Mascarpone
1 Teaspoon Vanilla Extract
24 Savoiardi /Ladyfinger Sponge Biscuits
½  Cup Homemade Limoncello or liqueur of your choice
½ Cup Homemade Mixed Berry Compote
50 Grams Chocolate - shaved
A Few Raspberries for decoration - I used dried

Method
In a medium bowl, beat the cream with an electric beater to soft peak stage.
In a separate bowl, beat the mascarpone, sugar and vanilla, until just combined (don’t overbeat).
Fold ⅓ of the whipped cream into the mascarpone gently so as not to knock out the air and repeat two more times until all incorporated.
Quickly dip each biscuit into the liqueur (don’t soak) and lay them side by side in a 8 inch square or rectangular tin or box lined with cling wrap will the sides hanging out.
Top the biscuit with half the cream mixture, spreading it over evenly with an offset spatula.
Spread most of the berry compote ( reserving a little for decoration) on top.
Repeat the biscuit and mascarpone cream layers again. Dot the remaining berry compote and make a design using a toothpick. Cover it with cling wrap. Refrigerate for 8 hours or overnight before serving.
Before serving top with the shave chocolate, followed by the raspberries.
Labels: Eggless, No Bake, Dessert, Italian, Savoiardi, Mascarpone, Heavy Cream, Raspberry, Sunday Funday
For our event called Sunday Funday, wherein we share recipes our families will love to enjoy on a Sunday. Our theme for Sunday Funday: "Raspberry Cake".  

Continue Reading
3 comments
Share:

Homemade Mixed Berry Compote/Sauce

This is known by different names, berry sauce, berry coulis or berry topping, berry compote is essentially berries cooked down with a little sugar and lemon juice until thick and syrupy.
The berries will break down as you cook them, they won’t hold their shape. This makes it perfectly spoon able.

If you don’t like the seeds, you can easily push the compote through a sieve to separate them from the flesh and in so doing, you have a perfectly smooth berry sauce.
You can use the berry compote while still warm, at room temperature or when cold and there is nearly unlimited number of ways to use it.

This compote can’t be preserved for long periods as it doesn’t contain enough sugar. You’ll need to eat this within 6 - 7 days of making it or freeze it for up to 2 months. This compote is naturally vegan and gluten free too!
This is so quick to make, you can have this vibrant berry compote ready for topping your pancakes, cakes, ice cream and so much more. This thick berry sauce is so versatile and so easy to make.  

Makes ½ Cup
Ingredients

1 Big Cup Frozen Mixed Berries
2 Tablespoons Heaped Sugar or to your taste
A Juice of Half a Lime
½ Teaspoon Vanilla extract
Method
Place the berries, sugar or lemon juice into a medium saucepan over medium flame. As it heats stir until everything is mixed. 
Bring to a simmer and cook stirring every so often for around 10 to 12 minutes or until the juice has thickened. 
Mash the berries with a spoon to make a sauce. 
Stir in the vanilla then pour it into your preserving jar and let it cool to room temperature before lidding and storing in the fridge.  
Labels: Condiments, Sauces, International Cuisine, Mixed Berries, Healthy, Homemade

Continue Reading
No comments
Share:

Split Green Moong Khichdi /Chilkewali Moong Dal Khichdi#SundayFunday

This Khichdi is delicious, full of proteins, nutritious, satisfying, nourishing and most of all it's a complete one pot meal.

Ingredients 
¾ Cup Split Green Moong/Chilkewali Moong Dal
1¼ Cup Rice
1 Small Onion - 
chopped
½ Teaspoon Ginger Paste
½ Teaspoon Chopped Garlic
1½ Teaspoon Cumin Seeds
½ Teaspoon Asafoetida
2" Cinnamon Stick
8-10 Whole Black Peppercorns
¼ Teaspoon Turmeric Powder
Salt To Taste
1 Tablespoon Desi Ghee Or Oil
4½ Cups Water

Method
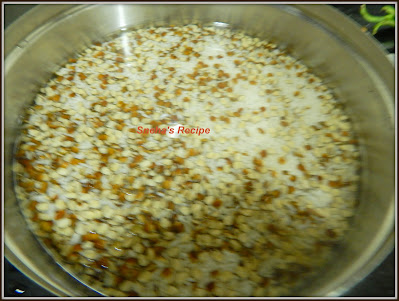
Wash and soak rice and dal in 2 cups of water for 20 -30 minutes. Wash gently so that the skin from the dal doesn't come off, 2 - 3 times is more than enough. Measure the water because we are going to use the same water to make the khichdi.
In a pan, heat ghee or oil ( I used desi ghee). Add cumin seeds when they, sizzle, add asafoetida, cinnamon and peppercorns, sauté for a second then add the onions. Cook just till onions are translucent. 
Add ginger, garlic, salt and turmeric, sauté for a minute or two.
Add 2½ cups water and bring it to a boil.
Add the soaked rice, dal and the water in which it was soaked in, stir well but carefully, taking care that the grains of rice do not break. Bring this to a rolling boil.
Mix again lightly, cover and cook on low flame for 10-12 minutes or this the rice and dal are fully cooked.
If all the water has been absorbed, the khichdi is done. Give it a light stir so that the dal is rice is mixed well. Cover and cook for a 2 -3 minutes. Switch off the flame and let is sit for another 3 to 5 minute. Before serving, lightly fork to separate the grains.
Serve piping hot topped with desi ghee, yogurt, a fried chilly, chopped onion, a slice of lemon and garlic chutney. 
Labels: Rice, Split Green Moong, Khichdi, Healthy, Main course, Gluten free, Sunday Funday
For our event called Sunday Funday, wherein we share recipes our families will love to enjoy on a Sunday. Our theme for Sunday Funday: " Rice".


Crawfish Fried Rice from Food Lust People Love
Insalata da Riso from Italian Rice Salad from Pandemonium Noshery
Instant Pot Chicken and Rice from A Day in the Life on the Farm
Palak Rice from Mayuri’s Jikoni
Pork Stir Fry Skillet from Amy’s Cooking Adventures
Quick Shrimp Fried Rice with Peas and Carrots from Karen’s Kitchen Stories
Spanish Rice from Palatable Pastime
Split Green Moong Khichdi /Chilkewali Moong Dal Khichdi from Sneha’s Recipe

Continue Reading
4 comments
Share:

Lemon Blueberry Muffin #BundtBakers

This Lemon Blueberry Muffin is loaded with plump, sweet blueberries and tart lemon juice, if you love the tartness of lemon then this is for you. This makes two muffins or one large jumbo muffin. If you are making one large jumbo muffin then the baking time will differ accordingly.

Makes 2 Muffins
Ingredients

½ Cup All Purpose Flour
½ Teaspoon Baking Powder
1/8 Teaspoon Salt
2 Tablespoons Heaped Butter - melted
3 Tablespoons Heaped Caster Sugar
1 Large Egg Yolk Only
½ Teaspoon Lemon Eest
¼ Teaspoon Vanilla Extract
3 Tablespoons Milk
2 Tablespoons Lemon Juice
½ Cup Blueberries - I used frozen
Method
Preheat oven 190°C. Grease 2 (250ml) molds. Set aside.
In a small bowl, mix together the flour, baking powder and salt.
In a separate medium-sized bowl, stir together the melted butter and sugar. Add in the egg yolk and whisk until completely blended. Whisk in the lemon zest, vanilla, milk and lemon juice.
Stir the dry ingredients into the wet ingredients and mix until combined.
Gently fold in the blueberries.
Pour batter into prepared molds. Bake until top is golden and center is completely cooked when a tooth pick is inserted in the center comes out clean. Place them on a rack to cool. 
Serve warm with a cup of tea or coffee.

Labels: Serves Two, Lemon, Blueberry, Bundt, Bundt Bakers, Muffins
#BundtBakers is a group of Bundt loving bakers who get together once a month to bake Bundts with a common ingredient or theme. You can see all of our lovely Bundts by following our Pinterest board. We take turns hosting each month and choosing the theme/ingredient.Updated links for all of our past events and more information about BundtBakers, can be found on our home page.
Let's take a look at the different Bundts that everyone baked up with us today 

Continue Reading
3 comments
Share: