Masala Bread Rolls # BreadBakers


When the theme for this month bread bakers event was choosen, was very happy, since long I wanted to bake this bread. But inevitable always purchased it from the supermarket. Then came the day when I really baked it home. My daughter too loves this masala bread rolls. She enjoyed having this and delighted to have the home made one.

Sending these to the bread bakers event our host Deepti - of: Baking Yummies choose this theme rolls. Thanks dear for this theme, baked this wonderful bread at last.

This is a very easy bread to bake with simple ingredients that are always available in the kitchen. Just try this bread and you will be satisfied and happy with the results and taste.

Ingredients

3/4 - 1 Cup Warm Water
2 teaspoons Dry Instant yeast
2 Cups All-purpose
1 Tablespoon Oil
1 Teaspoon Salt
1 Teaspoon Sugar

For the Masala filling:
8 Cloves Garlic - minced
3/4 Teaspoon Cumin powder
3 Teaspoon Oil
1/2 Teaspoon Chat Masala
1/2 Teaspoon Chilly powder
1/2 Cup Coriander Leaves

Method
In a large bowl, whisk together the flour, salt, yeast and sugar. Make a well in the center of the flour and pour in the oil. Mix this together by adding water to form a soft dough and knead for 5-10 minutes. Shape the dough into a ball and lightly coat with oil. cover with plastic wrap and set it at room temperature to double in volume.


In the meantime let prepare the filling.  Put all ingredients into a small mixer jar and blend coarsely. Do not add any water to it while blending the oil will be enough to coarsely blend it. Keep aside.

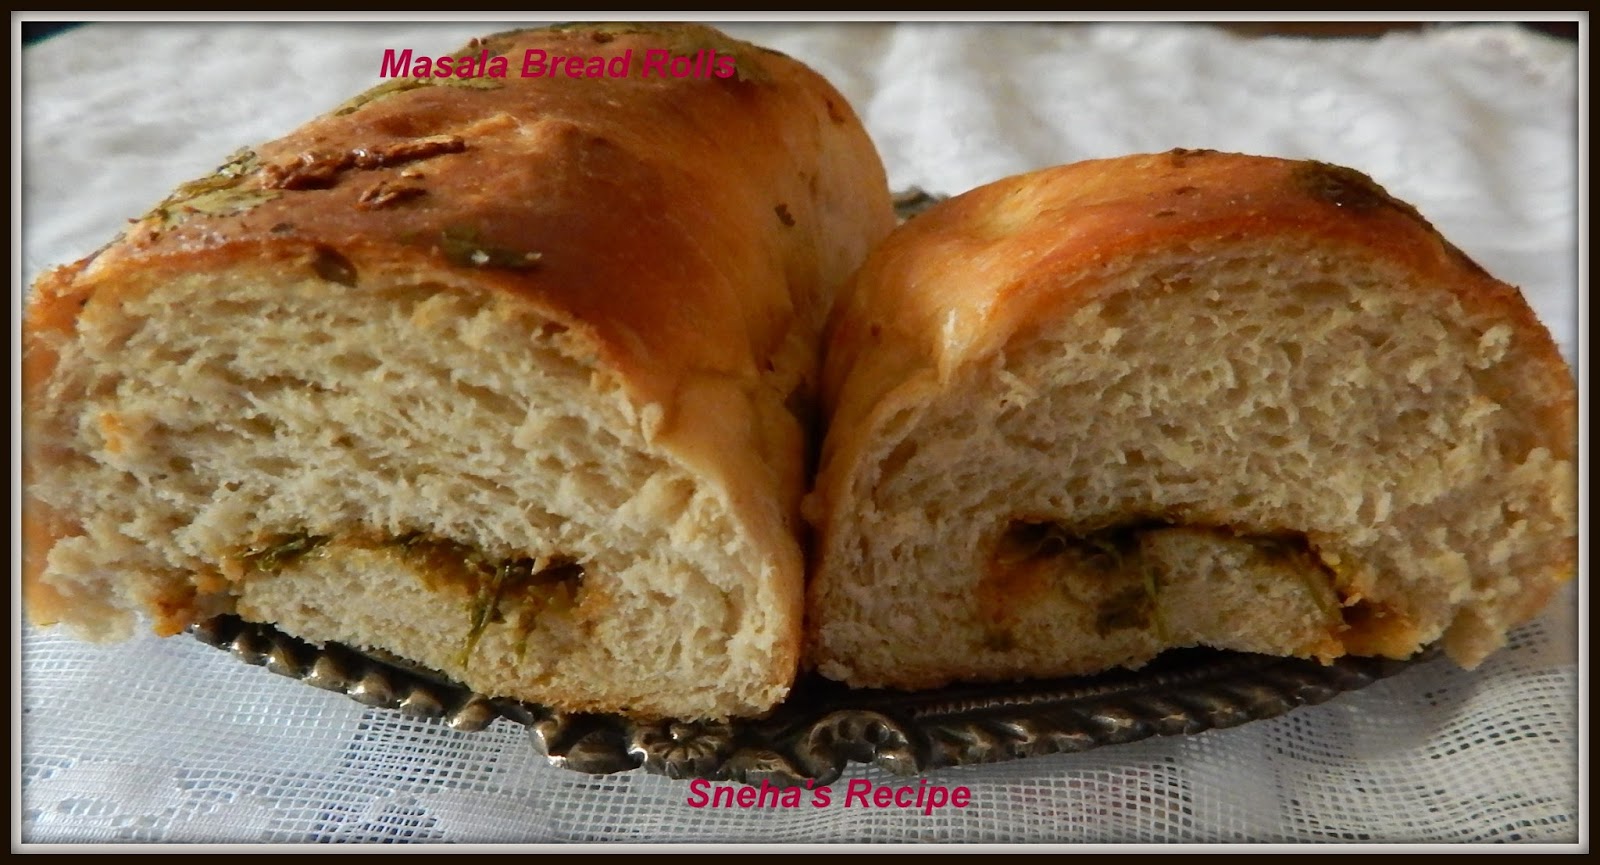
When the dough has doubled in size, cut it in three equal parts. Take one part of the dough and lightly flatten it with your hands into a rectangle. Spread the filling in the center and it into a roll.


Oil 3 small baking trays with little oil and keep the rolled bread into it. Make the roll of the other part of the dough in the same way and keep it also in the tray. Spread coriander leaves on the rolls lightly pressing them. Cover the tray, loosely cover them with plastic wrap and let them rise again until doubled in size. Brush them with egg wash or milk .

Toward the end of this rising period, preheat the oven to 200 degrees. Bake in the oven 15 to 20 minutes, or until nicely browned on top.


When they are done, take out of the oven and brush with the butter and serve.

Lightly crusty on the outside, fluffy soft, delicious masala bread roll is ready.


Just grab one, slice it, butter it and enjoy.......


Labels : Breads, Bread Bakers, Masala bread rolls

.
BreadBakers #BreadBakers is a group of bread loving bakers who get together once a month to bake bread with a common ingredient or theme. Follow our Pinterest board right here. Links are also updated each month on this home page.

We take turns hosting each month and choosing the theme/ingredient.

Continue Reading
10 comments
Share:

Southern Buttermilk Biscuits


When I went to make these biscuits, looked into the bag of self rising flour found only a cup. Actually this recipe requires only self rising flour, but substituted one cup with all purpose flour. The biscuits turned out good but not so flaky, the extreme hot weather in Mumbai made the butter just melt as I was incorporating it into the flour. Tried keeping the dough in refrigerator but that too did not help.

Sending these to 
Foodie Extravaganza Party - theme Buttermilk Biscuits our host of the month is Kathleen, thank you for hosting this event. 

Ingredients
1 Level Cup Self-rising flour
1 Level Cup All Purpose Flour
1/2 Teaspoon Baking Powder
1/4 Teaspoon Salt
2 Tablespoons Light Brown Sugar powdered
3/4 Cup Buttermilk - chilled
¼ Cup Heavy Cream - chilled
110 Grams Butter - chilled

Method


Preheat oven to 180 degrees.
Line a tray sheet with butter paper. Set aside.
In a large bowl add flour, salt and brown sugar. Whisk until well combined.
Grate the cold butter into the flour mixture.
Use a fork,  to cut the butter  into the flour mixture until it resembles large crumbs.
Make a well in the center of the bowl. Add the heavy cream and lightly mix it with your finger tips. Then add the butter milk gently little at a time to make sticky dough ( do not knead the dough).
Sprinkle flour generously on the work surface. Place dough onto floured surface.
Sprinkle the top of dough with flour and flour your hands as well.
Very gently, knead the dough by folding it in layers a few times while just a little flour,  so that the dough is not sticking to your hands or your work surface. 

Gently pat the dough out into a small rectangle about 1 inch thick, flour your biscuit cutter and cut out circles.  Place biscuits on the baking tray.
Bake for 15 minutes or until golden. 


Brush with melted butter as soon as they come out of the oven. Serve warm and enjoy with a cup of tea.

Labels :  Biscuits & Cookies, Foodie Extravaganza Party, Buttermilk
foodieextravaganza-300


Today's Foodie Extravaganza day is celebrating the Buttermilk Biscuit. Kathleen, from Fearlessly Creative Mammas is the host this month, and to celebrate her southern roots, she picked Buttermilk Biscuits as the theme. May 14th is actually Buttermilk Biscuit day, but we get to pick from any of the foods in the specific month, so Buttermilk Biscuits it is. We pick our foods from the website The Nibble. Posting day is always the first Wednesday of each month. If you are a blogger and would like to join our group and blog along with us, come join our Facebook page Foodie Extravaganza. We would love to have you! If you're a spectator looking for delicious tid-bits check out our Foodie Extravaganza Pinterest Board! Looking for our previous parties? Check them out HERE.


Cacio e Pepe Biscuits by Laura at Baking in Pajamas Buttermilk Biscuit Mixed Berry Shortcake by Wendy at A Day in the Life on the Farm 
Savory Buttermilk Butter Biscuits by Kathleen at Fearlessly Creative Mammas 
Tarragon Sweet Potato Biscuits by Caroline at Caroline's Cooking 
Maple and Bacon Cheddar Buttermilk Biscuits by Rebekah at Making Miracles 
Cinnamon Sugar Buttermilk Biscuits by Lauren at From Gate to Plate 
Bacon Honey Mustard Biscuits by Stacy from Food Lust People Love 
Buttermilk Lemon Biscuits by Kathya from Basic N Delicious Southern Buttermilk Biscuits by Georgina from G'Gina's Kitchenette 
Biscuit Cinnamon Rolls with Chopped Pecans by Elaine from Cookin and Craftin 
Biscuit French Toast by Teri from The Freshman Cook Southern Buttermilk Biscuits by Sneha from Sneha's Recipes

Continue Reading
6 comments
Share:

Red Bean Stew - A Vegetarian a Yemeni stew


This is had for breakfast or dinner in Yemen. We had this for our dinner. When I, served this for dinner and they tasted it, immediately said this is just like the Rajma curry that you make, only less spices. Yes it true, its taste amazing with less spices. Try it and you will love it. Sending this to Mena cooking club , this month we are exploring Yemeni cuisine.


Ingredients


1.1/2 Cups Dried Red Beans / Rajma
1/4 Cup Olive oil
1 Large Onion - finely chopped
3 + 3 Garlic cloves  - finely chopped
1 Large Capsicum- cut in small cubes
2 Tablespoons Sweet Paprika
3  Tablespoons Tomato paste
1 Bay leaf
1 Teaspoon Salt
1 Teaspoon Oregano
1 Teaspoon Cayenne
1/2 Teaspoon Sugar
1 Veg Stock Cube
1/4 Teaspoon Freshly ground pepper
2 Tablespoon Coriander Leaves - finely chopped
1 Tablespoon Dill leaves - finely chopped

Method


Wash and soak the beans for 6 hours or overnight in water.

Drain the beans, place the beans in a pressure cooker or a large pot. Add enough water to cook the beans, turn the heat to medium-high and bring to a gentle boil. Cook till the beans are soft and tender yet whole.

Heat oil in a large, skillet and add the onions,  saute till light golden . Add half of the chopped garlic and cook  until the garlic is fragrant.  Add salt and paprika, add the capsicum. Cook, stirring, for a couple of minutes, until the vegetables are well coated with paprika and the mixture is aromatic. Add the tomato paste and bay leaf and water from the beans to the pan, stir  well, a
dd the oregano, the remaining garlic cloves, salt to taste, cayenne and sugar, and continue to simmer for another hour.  Reduce the flame, cover and  let it simmer for half  an hour till the stew is thick. To make it even more thicker smash some of the rajma to make  a thick gravy.

Just before serving, stir in the coriander and dill. Serve each portion with  thick yogurt and thick slices of crusted bread. Hmm mm mmm .... satisfying and delicious...


Labels : Vegetables, Yemeni, Rajma, Mena Cooking Club

Continue Reading
3 comments
Share:

Jabeez - Yemeni Style Savory Cake


Jabeez is a Yemeni style savory cake served as appetizers during Ramadan. In Mena cooking club this month we are exploring Yemeni cuisine.   I made two recipes from the given list this and the Red Bean Stew.  Wanted to make third  -  Khaliat Al Nahl, but here it too oo very hot to on the oven so left this. Thanks Mena for hosting this month.

Serves -  6 Cakes
Ingredients

1.1/4 Cup Dried Black Eyed Peas 
1/2 Cup  Bread crumbs
2  Scallions / Spring Onions - finely chopped
1 Egg - beaten
2 Tablespoons Capsicum  - finely chopped
1/2 Teaspoon Salt or to taste
1 Teaspoon Jalapenos - finely chopped

1/4 Teaspoon Turmeric
1/2  Teaspoon Black pepper powder
3/4 Teaspoon  Cumin powder
2 Tablespoon  Coriander leaves - finely chopped
Oil for frying 


Method

Wash and soak  the  black eyed peas for an hour or two. Then drain the water and blend it to a fine paste.  If needed add a tablespoon of water, but I did not require,  ground this in a small mixer jar little at a time.

In a bowl add the pea paste along with scallions, jalapenos, capsicum, coriander leaves, cumin powder, black pepper powder,  turmeric and  salt, mix them well.   Add  half the beaten egg and mix well, if the paste is watery , add a tablespoon of bread crumbs(  I did)  It will form into a thick smooth paste. Taste and adjust salt if needed.  Make small cakes and place them  in  a plate and keep it in the refrigerator for a hour to set well.  

Heat 2 tablespoons of  oil in a pan.

Roll each cake in  bread crumbs and then dip each in egg and fry the cakes on medium flame till brown on both sides.  We enjoyed this hot with spicy  chutney. 


Labels:  Black Eyed Peas, Starters, Mena Cooking Club, Yemeni


Continue Reading
No comments
Share:

Homemade Paneer - How to Make Paneer ( Cottage Cheese) at Home


Paneer is a type of fresh cheese that is used in India and Asia. Many savory, sweet and gravies are make with paneer . It is easy to make and it does not require any special gadgets. It is completely vegetarian and homemade paneer is unsalted, fresh and soft.
Ingredients


1 L Full Cream Milk
1/4 Cup  
Lime juice/ Vinegar  
1/2 Cup Water
2 Tablespoon Curd

Method

Mix the lemon juice or vinegar in water and keep aside.


Place the curd in a large saucepan in which you are going to make the paneer.  Then pour the milk into the saucepan and set over low heat.  When it just starts to heat up, add a tablespoon of vinegar or lime juice and stir the milk after each addition until the milk separates -  the solid curds starts to separate - a green and watery whey forms.


Take an empty vessel and place a sieve over it. 


Cover the sieve with a wet muslin or cheese cloth and pour the curdled milk into it. The whey will collect the bottom of the vessel and the curdled milk solids(called paneer) will remain in the cloth. Set aside the collected whey that can be used to knead chapati dough. Bring the edges of the cloth on all four corners and tie a knot. 


Dip this muslin cloth it in a bowl of cold water, rinse the paneer with fresh water till it cools and  hang it at a height or for the for the excess liquid to drain. 


Leave it aside for half an hour.


Now remove the knot of the muslin cloth and place the paneer along with muslin cloth on a wide plate, strainer or kitchen counter. Gently press it to form a rough square shape. Place a heavy weight or a saucepan of of water on the cheesecloth and let it be for an hour or  till all the water is drained and forms firm or harden paneer.


Now the paneer is set, remove it from the muslin cloth and cut it into any shape of your choice. 


You can use it right away to make the dish of your choice. If you are not going to use it immediately, place them in  the whey in an airtight container for 3 -4 days  or in a zip lock bag and freeze  it till further use.


My Notes

Can  use leftover whey from a previous batch of paneer instead of vinegar or lime juice.

Can use half full cream and half pasteurized milk to make paneer.  Zero fat or skimmed milk will not make good paneer.

Keep 
the milk  on low flame and keep stirring  while it's becoming hot to prevent it from getting burnt at the bottom. Take care and do not bring the milk to a boil. 

Do not use pre-boiled  or spoiled milk to prepare the paneer.


You can prepare flavored paneer by adding spices and herbs of your choice while making the paneer recipe. At the time of curdling the milk,  add finely chopped mint leaves or coriander leaves or crushed black pepper or red chili flakes or herbs of  your choice. 


See the pics of  Homemade Herbed / Coriander Paneer


Labels:  Paneer, Homemade, Milk, Herbs

Continue Reading
1 comment
Share: