Showing posts with label Baking Bloggers. Show all posts

Bread & Butter Pudding#BakingBloggers

British Bread Pudding is different from other Bread and Butter Pudding. The British version bread pudding can be sliced and served.
Today is our posting for Baking Bologgers and the theme is British Baking our host and creator of this group is Sue Lau

Serves 3 to 4
Ingredients

4 Big Slices White Bread
1/4 Teaspoon Freshly Grated Nutmeg
50 Grams Butter
1/3 Cup Golden Raisins
4 Tablespoons Heaped Sugar
1 Teaspoon Vanilla Essence
2 Eggs
500 Ml Milk

Method 
Preheat the oven to 180 degrees C. Grease a square or rectangle dish well with butter.
In a bowl beat the eggs, add the vanilla, give it a stir and keep aside.
In a saucepan, gently heat the milk, but do not boil. Add the sugar, stir it till it melts. Set aside. Slowly pour the warm milk over the beaten eggs, whisking continuously, until all the milk is added. 
Strain this mixture. Keep aside.
Cut bread into triangles. 
Spread one side the bread triangles with butter. Then cut into smaller triangles.
Cover the base of the dish with overlapping triangles of bread, butter side up. 
Sprinkle half the golden raisins evenly over the bread, then lightly sprinkle with a little nutmeg. 
Then pour the milk mixture over it and let it soak for 30 to 45 minutes, covered with cling film. 
After the soaking time sprinkle the remaining raisins and bake at 180 degrees C for 30 to 35 minutes 
or until the surface is golden brown and the pudding is well-risen
Once out of the oven the pudding will deflate.
 Slice it..
Serve hot and enjoy! 
Labels: Bread, Butter, Pudding, Baked, British, Raisins, Baking Bloggers, Cakes, Sweets & Desserts
Baking Bloggers is a friendly group of food bloggers who vote on a shared theme and then post about it once per month. If you are a food blogger interesting in joining in, inquire at our Baking Bloggers FaceBook Group. We'd be honored if you would join us in our baking adventures.
British Baking  Recipes
Bread & Butter Pudding by Sneha's Recipe
Chocolate Chip Scones by Jolene's Recipe Journal
Eccles Cakes by Caroline's Cooking
English Granary-Style Bread by Karen's Kitchen Stories
Fat Rascals by Palatable Pastime
Jammie Dodgers by Culinary Adventures with Camilla
Mini Toad in the Hole by Sid's Sea Palm Cooking
Raspberry Bakewell Tarts by Pandemonium Noshery
Salmon in Puff Pastry by Reviews, Chews & How-Tos
Sticky Toffee Pudding by Cookaholic Wife
Strawberry Almond Crumble by Food Lust People Love
Strawberry Dark Chocolate Shortbread Biscuits by Faith, Hope, Love, & Luck Survive Despite a Whiskered Accomplice
Traditional Scottish Shortbread with Rose by The Schizo Chef
Wizarding World Chocolate Trifle by Simple Inspired Meals
Continue Reading
5 comments
Share:

Baked Mexican Chicken Spaghetti#BakingBloggers

Whenever  we are invited for a party , I always ask my host what can I bring.   Took this  Baked Mexican Chicken Spaghetti for the dinner party.

This was  a delicious and makes a fantastic festive dinner that your friends and  family will enjoy. It's topped with cheese, Mexican seasoning, baked until it becomes oey, gooey and the cheese is melty, to perfection. 

Servings 7 -8
Ingredients  

1 Kg Boneless Chicken - chopped into tiny cubes
2 Large Onions - finely chopped
1 Tablespoon Each Ginger Garlic - minced
1 Green bell pepper - finely chopped
200 Grams Tomato Puree
2 Jalapenos - finely chopped
2 Tablespoons Finely chopped Parsley
6 Medium Ripe Tomatoes
1 Packet Mexican Noodle Taste Maker
1 Teaspoon Cayenne pepper
Salt to taste
1 Teaspoon Mexican Seasoning
3 Tablespoons Oil
500 Grams Spaghetti pasta

For the Toppings  

Few Fresh Basil Leaves
Mixed Herbs
Mexican Seasoning
Chopped Parsley
Diced Coloured Bell Peppers

Chopped Spring Onion Greens
Grated Cheese as required - see notes
Method

First cook the spaghetti as per package instructions. Drain it and keep aside.
Blanche the tomatoes, remove the skin and chopperize them. Keep this aside.
Heat oil a large skillet, add the onions , ginger and garlic, saute till the onions are translucent, add the chicken and saute till it turn pink to white, now add the, tomato puree and chopperized tomatoes, Mexican taste maker , jalapenos and stir fry till nicely mixed. Reduce the flame to medium low and let it cook till dry but still moist. Now add the chopped capsicum and Mexican seasoning, cayenne pepper and taste for salt and add accordingly. See that this mixture is not dry but saucy. 

Grease a big casserole dish lavishly with oil or butter , I used a non stick baking dish to make this.
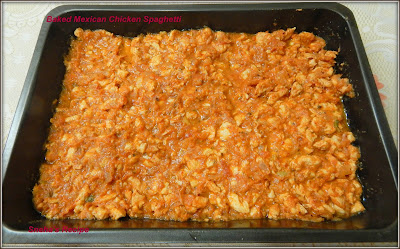
Transfer the chicken mixture to the baking dish 

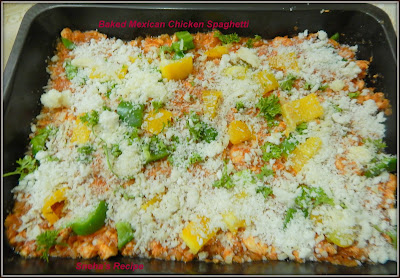
Place the coloured bell peppers, sprinkle chopped parsley. 
Sprinkle little cheese on top 
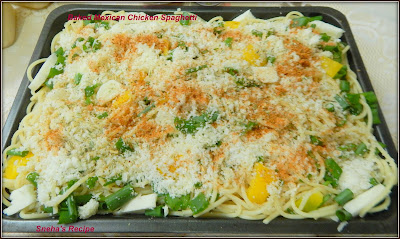
Spread  the spaghetti and place the coloured bell peppers, sprinkle chopped parsley and spring onion greens again cheese as much as you would like, I used a total of 1.1/2 cups of grated cheese.
A sprinkle of Mexican seasonings and mixed herbs on  top 
Dot it with tiny cubes of butter and and few basil leaves  bake  at 180 until cheese is melted or for about 20 to 25 minutes. 
Remove from oven, and let sit 5 minutes or so. Serve and enjoy!  Isn't this  Mexican Chicken Spaghetti, so creamy, dreamy and delicious! 

My Notes
I used a mix of Sheep cheese and cheeza cheese.

Labels : Baked, Pasta & Noodles, Chicken, Mexican, Baking Bloggers, Spaghetti, Cheese, Mexican Seasoning, Main course 
Baking Bloggers, theme for the month is Baked Pasta and our host is Sue


Baked Mac and Cheese with Corn by Anybody Can Bake
Baked Mexican Chicken Spaghetti by Sneha's Recipe
Cavatini by Palatable Pastime
Cheesy Artichoke Ravioli Casserole by Food Lust People Love
Cheesy Vegetable Pasta Bake by Cook with Renu
Creamy Lemon Chicken Pasta Bake by Caroline's Cooking
Greek Giouvetsi by Pandemonium Noshery
Macarona Bechamel (Egyptian Baked Pasta) by Tara's Multicultural Table
Meatless Lasagna by A Day in the Life on the Farm
Mushroom And Artichoke Pasta Bake by Oventales
Rakott teszta (Hungarian Layered Noodles) by Sid's Sea Palm Cooking
Sausage and Spinach Lasagna by Cookaholic Wife
Spiralized Sweet Potato Macaroni and Cheese by Karen's Kitchen Stories
Turkey Ham Mac and Cheese by Cindy's Recipes and Writings
Turkey Tetrazzini by Reviews, Chews & How-Tos

Continue Reading
3 comments
Share:

Gingerbread Cake With Lemon Glaze#BakingBloggers

In India  molasses  is known as Kakvi.  Kakvi is the stage before the final process of making jaggery. I have used the store bought molasses . But, you can make this at home with jaggery or fresh sugarcane juice. Will make this soon and post recipe. This is often used as a topping to eat with sweet pancakes or soft chapatti for breakfast. But it's the first time I am using it in baking.  
This Gingerbread Cake With Lemon Glaze was hit at home and also my friends.  

To bake this use a a rectangle pan with height and a small pan so that this will get  a lift.  I used a 8 by 6 inches and 2 inch height  rectangle pan and it was right for this cake.
I loved this month theme of Baking Bloggers.  Let's make this Gingerbread Cake With Lemon Glaze.

Ingredients 
Dry Ingredients
1.2/3 Cups All Purpose Flour
1 1/4 Teaspoon Baking soda
½ Cup White sugar
2 Teaspoons Heaped Homemade Ginger powder
1 Teaspoon Cinnamon powder
1/2 Teaspoon Sea Salt
1/4 Teaspoon Chinese five-spice powder
Wet Ingredients

1 Large Egg
1/2 Cup Dark Molasses / Kakvi
1/2 Cup Vegetable Oil
1/2 Cup Boiling Water

For the Lemon Glaze

½ Cup Icing Sugar
A Juice of one small lemon
1 Teaspoon Lemon zest

Method

In a bowl mix all the dry ingredients and spices well. 
In a another bowl add the molasses,vegetable oil and egg, whisk well, now  mix in the dry ingredients a little at a time.  It will become a thick batter.  Now add the boiling water and whisk till it forms a smooth and lump free batter.
Pour this into a greased, lined and floured  baking pan and tap it well to remove any air bubbles bake at 180 degrees C for 35 minutes.
As the cake is baking let's make our glaze  
Mix all ingredients in a pan and place it on very low flame to warm it well and sugar dissolves. 
 As soon as the ginger bread is out of the oven 
pour all the lemon glaze and let it cool. Cut into slices and serve with ice cream or whipped cream. We enjoyed just as it is.
This was delicious and yummy.
Labels:  Cakes, Gingerbread, Molases, Kakvi,Homemade Ginger powder, Baking Bloggers, Lemon Glaze

Baking Bloggers
Baking with Ginger
Gingerbread Cake with Lemon Glaze by Sneha's Recipe
Ginger Cream Sandwich Cake by Sid's Sea Palm Cooking
Gingerbread House Tutorial by The Redhead Baker
Gingerbread Madeleines by Caroline's Cooking
Gingerbread Men by Cook with Renu
Gingerbread Sandwich Cookies by Karen's Kitchen Stories
Gingersnaps by Simply Inspired Meals
Louisiana Syrup Cake (Cajun Gingerbread) by Palatable Pastime
Russian Pryanik Gingerbread by Pandemonium Noshery
Orange Cranberry Gingerbread by Food Lust People Love
Pernik by A Day in the Life on the Farm
Poussins aux Pain d'Epices by Culinary Adventures with Camilla

Baking Bloggers is a friendly group of food bloggers who vote on a shared theme and then post about it once per month. If you are a food blogger interesting in joining in, inquire at our Baking Bloggers FaceBook Group. We'd be honored if you would join us in our baking adventures.

Continue Reading
3 comments
Share:

Skillet Rosemary & White Wine Chicken Leg#Baking Bloggers

In baking bloggers, which is a group started by Sue , where in the topic for November month is baking in cast iron. I had purchase this lodge cast iron skillet many months back and had not yet used it. This theme gave me an opportunity to use it, thanks Sue for this wonderful theme.
Soft and juicy Cast Iron Skillet Chicken legs with fresh rosemary and white wine is so delicious, it's a hassle free, ready in less than 30 minutes! Just marinate the chicken and the veggies of your choice, pop the entire skillet in your oven and you will have tender, juicy chicken legs ! I have a small 23 cm skillet so one chicken leg with thigh can fit into it, added some halved red baby potatoes, a complete and power packed meal is ready. 

Ingredients

1 Chicken Leg with thigh
2 Sprigs of Fresh Rosemary
¼ Teaspoon Sumac
¼ Teaspoon Freshly Crushed Black pepper
¼ Cup White Wine
A Juice of one small Lemon
Salt to taste
4 Red Baby Potatoes
1 Teaspoon Olive Oil

Method 
Wash and pat dry the chicken with a kitchen paper towel. 

In bowl mix in the lemon juice, olive oil, rosemary, sumac, crushed pepper and salt to taste. Rub this marinade into the chicken well. Toss in the halved red baby potatoes into the remaining marinade and place them into the skillet along with the chicken leg.  
Pre-heat the oven with both elements on at 200 degrees. Before you pop the skillet into the oven pour in the white wine and bake for 30 minutes. After 15 minutes remove the skillet holding the handle with silicone gloves, turn the side of the chicken and potatoes, pop this back into the oven for another 15 minutes and its done.  
Yum yum juicy and tender Skillet Chicken legs are ready to enjoy!!
Labels : Skillet, Chicken, Baked, Baking Bloggers, Baby Potatoes, White Wine, Sumac, Rosemary, Healthy Dinners, Complete Meal  
Check the other recipe of : -
Baking Bloggers: Cast Iron Baking Baked Cheese and Sausage Ziti by Food Lust People Love
Blackberry Coffeecake Bites by Sid's Sea Palm Cooking
Cast Iron Jalapeno & Honey Corn Bread by Hardly A Goddess
Dutch Oven Bread by Simply Inspired Meals
Dutch Oven Swiss Chocolate Cake by Daily Dish Recipes
Pull-Apart Garlic Rolls by Karen's Kitchen Stories
Skillet Apple Pie by Palatable Pastime
Skillet Cornbread with Bacon, Onion and Cheddar Cheese by Our Good Life
Skillet Rolls by A Day in the Life on the Farm
Skillet Rosemary & White Wine Chicken Legs by Sneha's Recipe

Continue Reading
3 comments
Share:

Twisted Garlic Cheese Bread#BakingBloggers

Cheesy Twisted garlic bread is a great snack or appetizer.  I made this for our evening snack and they turned out so crisp and cheesy.   I had some leftover bread dough in the refrigerator, made these.  You can used any leftover bread dough to make these.

Kids will love them, this can be packed as tiffin for children or even as a travelling snack.  Its is easy and takes hardly any time to make.  Not much of second proofing.  These turned a little  more brown, cause I left them in the oven and went down for some urgent work and by the time I came and checked they had already turn this color so keep a watch while baking them.

For Baking Bloggers Sue of Palatable Pastime is our host and every month we get to vote on theme. For month of October we asked to bake with garlic as an ingredient.

Ingredients

For the dough
Use any of the bread recipe on my blog
For the filling
1/4 Cup Butter  - softened
2 Big Cloves Garlic  - minced
Grated  Cheddar cheese as required 
Method
Preheat oven to 180 degrees.

To make the  pizza dough , mix all ingredients in a bowl and add water little at time , knead to a soft dough.  Keep this in a oiled bowl for a hour or so till it doubles in volume.  

After it double in volume, punch down and divide into three parts.
Roll the dough on to a board into a big circle.
In a small bowl combine softened butter and garlic. Spread butter and garlic mixture over circle.
Sprinkle cheeses over half of the dough.
Fold other half over the cheese half.
Cut into small rectangles.

Carefully twist each rectangle and place on a baking sheet spacing about an inch apart.
Bake  for 15 minutes or until a golden brown.

Labels : Garlic, Cheese, Breads, Baking Bloggers, Snack, Kids delight, Leftover series

Baking Bloggers: Vampires Beware! We're Baking with Garlic!

Continue Reading
5 comments
Share:

Chipa Argolla#BakingBloggers

Chipa Argolla  is recipe of Paraguay.  This is a breakfast or a snack small cheese bread which has, two versions one  is called chipa the other is chipa argolla.  Chipa argolla is the popular ring shaped version.
  I,  believe that in Paraguay, the town of Coronel Bogado, which is the capital of chipas,  even hosts an annual festival of chipas. The word chipa comes from the Guarani language and it  means cake or bread.

These are a mainly prepared, given to family and friends   during the Holy Week of Lent. 
For Baking Bloggers Sue of Palatable Pastime is our host and every month we get to vote on theme. For September the theme is biscuit and scone recipes which are American based.

I, have seen so many recipes on net, but,  this  is a perfect, tried and tested recipe.  
Ingredients
205 Grams Sabudana Atta / Tapioca Flour
115 Grams Fine Corn Meal
60 Grams Butter - unsalted   
2  Eggs
65 Grams Mozzarella Cheese - grated
65 Grams Parmesan Cheese - grated
½ Teaspoon Heaped Anise seeds / Saunf  
¼ Teaspoon Salt  
¼  Cup Milk
¼ Teaspoon Baking powder

Method
In the bowl, add the butter and the eggs. Mix for a couple minutes with electric hand blender. Incorporate the grated cheeses and anise seeds. Add the salt and milk, mix well . Then, add the tapioca flour and corn meal,  continue mixing until well combined.   Keep this  covered with a cling film to  chill in the refrigerator for 30 minutes to an hour.
After you take the dough out from the refrigerator, add the baking powder and knead to a soft dough. 
Preheat oven to 180 degrees C.  Line two baking trays, with parchment paper and lightly dust it with cornmeal.  Keep aside.

Pinch the dough into small balls.  Roll each ball into a rope of about 5 or 6 inches long and ½ inch thick. Bring ends together to form a small circle and press to seal. Place them an inch apart on baking sheets .
I made the first tray into big circles and kept them about 2 -3 inches apart.  Found that on baking they did not expand much.  
The next tray, made small circles,  see pic above.
Bake them for 20 to 25 minutes until slightly golden  and can  see tiny red spots on the Chipa Argolla . Remove and cool them on to cooling rack. 
These are crisp from outside and soft and chewy from inside.
Lablels : Breads, Baking Bloggers, Mozzarella Cheese, Parmesan Cheese, Tapioca Flour, Cornmeal, Gluten free, Egg, Latin American, Paraguayan, Baked
Have a look at other Biscuits and Scones Recipes 

Continue Reading
5 comments
Share: