Indo Chinese Style Chilly Omelette Stir Fry#SundayFunday

This stir fried Chilly Omelette made Indo Chinese Style, is a change from the regular and monotonous omelette.  This is very quick to put up and will go very well with fried rice or as a side dish.
Serves 2 -3 
Ingredients

4 Large Eggs
¼ Teaspoon Pepper powder
¼ Teaspoon Red Chilly Flakes
¼ Teaspoon Salt
1 Tablespoon Oil

For The Sauce
3 Tablespoons Oil
1 Teaspoon Chopped Ginger
1 Teaspoon Chopped Garlic
1 Spring Onion - white & green chopped
1 Small Onion - cut into cubes  
1 Small Capsicum – cut into cubes
2 Tablespoons Red Chilli sauce
1 Tablespoon Light Soy sauce 
1 Tablespoon Tomato Ketchup
1 Teaspoon Vinegar
Method
Beat the eggs in a bowl, add in red chilly, pepper powder and salt to taste. Whisk them.
Heat oil into a hot pan ( used grill pan) on low flame and pour  little of  the egg mixture to make a thin omelette. 
While the omelette is still not cooked completely, roll it gently into then center 
Again pour a little mixture on to the empty side and swirl it to come to the bottom of the fold, again start to roll.
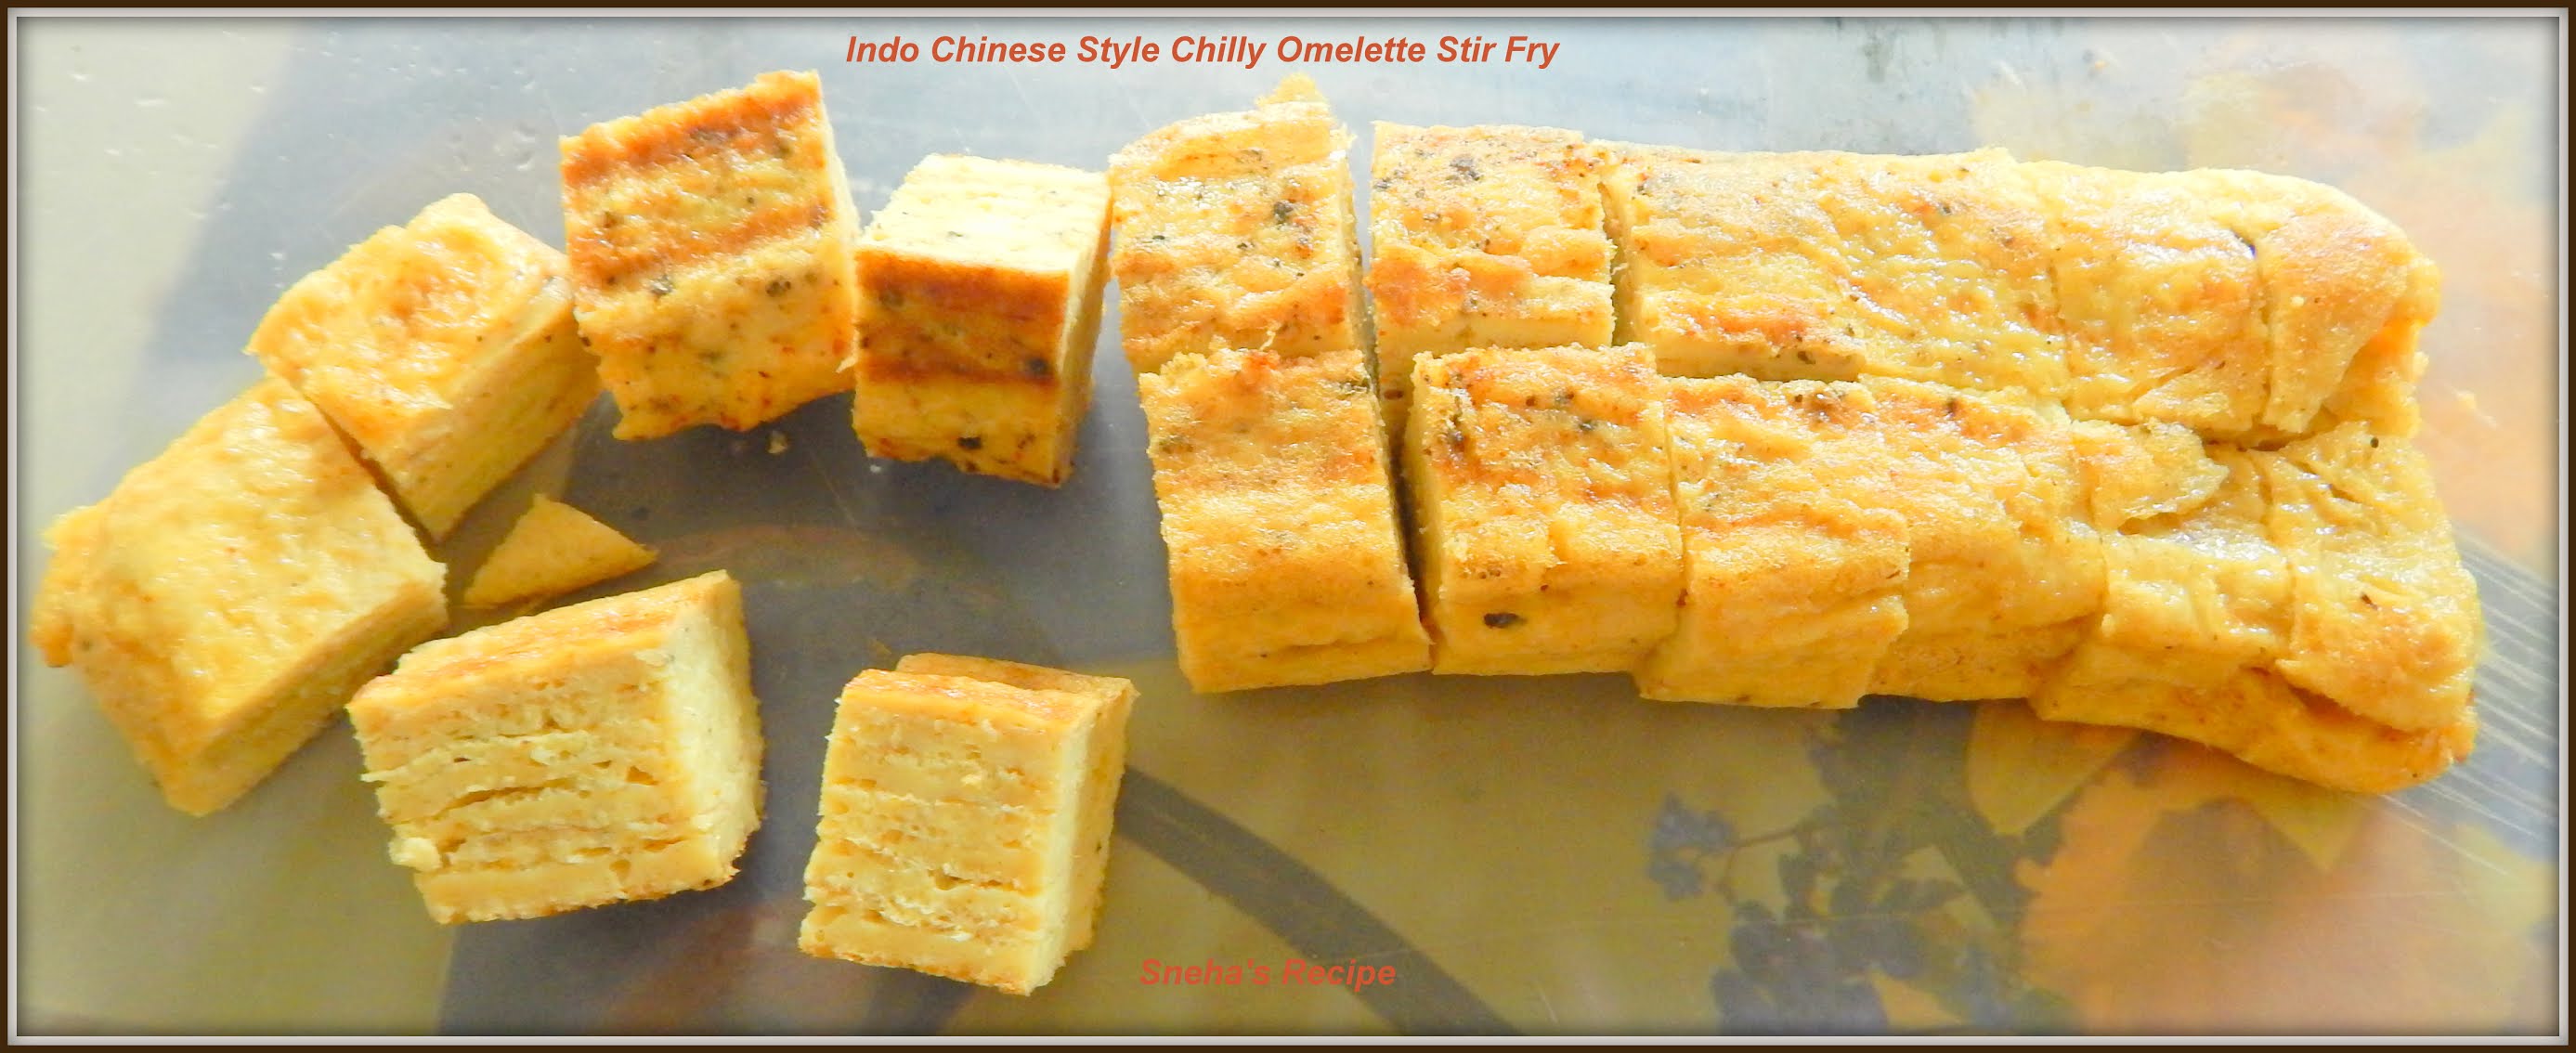
Do this process till all then egg mixture used. Make a thick roll.
Cut it from the center, see the layers!!
Then into cubes. Keep aside.
In another pan heat oil  add chopped ginger and garlic, sauté on high flame for a minute. Now add finely chopped white part of the spring onion. Sauté on high flame.
Add diced  onions and capsicum. Continue to sauté on the high flame. Add  all the  sauces and tomato ketchup ,vinegar and salt to taste and continue sautéing for a minute, Add the  egg pieces into the sauce and mix it so that the y are coated with the  sauce.
Finally add some finely chopped  spring onion green and serve hot.  Enjoy!!
Labels: Egg, Indo Chinese, Omelette, Stir Fry ,Side Dish, Vegetarian, Asian Cuisine, Sunday Funday
For Sunday Funday we are sharing Egg recipes.

Khoya/Mawa Gujiya With Dry Fruits#AlphabetChallenge

Gujiya/Turnover is a classic North India sweet which is crispy, flaky pastry filled with khoya/mawa and nuts stuffing. Gujia is generally deep fried. This are traditional is sweet that is made for Holi or Diwali festival.
Measurement 1 Cup = 200 Ml Cup
Ingredients
For The Dough

2 Cups All Purpose Flour
¼ Cup Desi Ghee
¼ Teaspoon Salt
½ Cup +1 Tablespoon Water 
For The Stuffing 
125 Grams Mawa/ Khoya Homemade
2 Tablespoons Fine Semolina/Rawa 
1 Cup Level Powdered Sugar
½ Teaspoon Green Cardamom Powder
1 Tablespoon Lightly Toasted Charoli - finely chopped
2 Tablespoons Golden Rasins– finely chopped
20 Lightly Toasted Cashewnuts - finely chopped
20 Lightly Toasted Almonds - finely chopped
½ Cup Desiccated Coconut
Method
Dry roast the semolina on a pan till light pink, remove and keep aside.
In the same pan separately toast the cashewnuts, almonds and charoli lightly, remove and keep them in a plate. Then finely chop them.
For The Dough 
Rub the ghee into flour with your hands well till it represents bread crumbs. Then first add ¼ cup water and start to knead into a stiff dough, add the other ¼ cup and make a stiff dough if necessary just a teaspoon to a tablespoon of water. 
This dough will not be smooth at all, but, do not worry just cover it with a damp cloth and let it rest for 45 minutes to an hour. In the meantime let's prepare the stuffing/filling.
Chop the dry fruit finely and mix in the desiccated coconut and cardamom powder.
Microwave the mawa on high power for a minute. Cool then add rest of the ingredients and mix well the filling is ready.
The dough has been rested and become smooth, knead it well again. make lemon size balls and roll it into a slightly thick puri. 
then cut it with a round cutter or use a gujiya mold to make them slightly wet the edges with water.  
then place a heaped tablespoon of filling. 
Cover it and seal it the edges by pressing it with your thumb, then with a fork make a design.
Like wise make all and let them rest covered with a damp cloth for 10 minutes.
In the meantime pour oil into deep frying pan and heat it till slightly hot and on medium low flame frying them 3 - 4 at a time or more if your pan is bigger till golden brown.
These are all fried, crispy flaky.
These are packed and ready to take for our trekker's party on the hills. Enjoy!!
My Notes
Make sure you do not add a lot of water while kneading the dough - the dough should stiff/hard.
Cook the khoya properly until it releases fat and become bit brown.
If you feel that the stuffing is dry the add few teaspoons of milk
Rest the dough properly and it will become easy to use.
You don’t need to apply any dry flour to roll the dough
Do not fry the gujiya on a high flame the flame should always be low.
Labels: Desi Ghee, Desiccated Coconut, Almond, Cashewnuts, Charoli, Golden Raisins, Mawa, Homemade, Festival Sweets, Deep Fried, Turnover, Gujiya, Alphabet Challenge
Let's take a look at the recipes being shared today with Alphabet "K"

Homemade Strawberry Balsamic Sauce#SundayFunday

My daughter went for a holiday to Panchgani and came back with loads of organic large sweet strawberries. They were super delicious, most we enjoyed eating and few I, freezed .
The other day while watching television seen this recipe and decided to recreate in my kitchen. Tweaked this recipe to my taste and turned out finger licking. You will love the tartness of the strawberries, lemon zest, balsamic vinegar and sweetness of the sugar.
Fruity, tangy, sweet and bright red color this sauce is finger licking. 
Ingredients
½ Cup (125ML) Balsamic Vinegar
20 Large Frozen Strawberries - roughly diced
3 Tablespoons Level Brown Sugar
¼ Teaspoon Sea Salt
Zest of One Big Lemon 
Method
The frozen strawberries when  thawed, it was mushy and left a lot of juice. In a sauce pan add the juice of the strawberries along with balsamic vinegar and bring it to a rolling boil then, reduce the flame a let it reduce into half. Now add in the strawberries, sugar, salt, and lemon zest. Mix well and bring this again to a rolling boil on medium high flame. 
Then reduce the flame until strawberries have released their juices and softened, let this simmer on very low flame until the sauce thickens. Keep stirring in between a bit. Allow to cool. It will stay in the refrigerator for a week or two. If you freeze this sauce it remains good for a long time, the best thing about freezing this sauce that it does not get ice granules, remains in sauce form only.  
This strawberry balsamic sauce it's finger licking.. ready for a multitude of uses.
Labels: Jams & Sauces, Strawberry, Balsamic Vinegar, Homemade,  Vegan, Gluten free, Sunday Funday 

Soft & Fluffy Sourdough Hamburger Buns#BreadBakers

These easy sourdough hamburger buns are light and fluffy, simple to make, they’re perfect to make the day before you want to use them. They are the ideal hamburger bun for a soups or burgers.
What I like about these buns
- You do not knead a food processor or kitchen aid to make the dough.
- They do not need a baking stone or Dutch oven for this, since the enriched dough will bake directly in a baking pan and it won’t require steam. 
Makes 9 Buns
Ingredients
For Feeding The Sourdough Starter

25 Grams Sourdough Starter
50 Grams All Purpose Flour
50 Grams Water
For The Buns Dough

450 Grams All Purpose Flour
150 Grams Water
100 Grams Milk
20 Grams Fresh Yogurt - optional
25 Grams Granulated Sugar
10 Grams Pink Himalayan Salt
100 Grams Active Fed Sourdough Starter
55 Grams Salted Butter 
Method
For Feeding The Sourdough Starter
Take 25 grams of leftover sourdough starter out of the fridge and feed it 50 grams all purpose flour and 50 grams of water. Stir the ingredients thoroughly to combine and mark the top of the starter with a rubber band. 
Cover the starter loosely with a lid and let it rise at room temperature for 5-8 hours, or until it doubles in size.
Mixing The Dough
When your starter has doubled in size and it’s ready to use.
Add the following ingredients to a large mixing bowl, the water, milk, yogurt, sugar, salt, and sourdough starter. Stir the liquid ingredients together with a spoon or a dough whisk to break of up starter and to dissolve the salt and sugar.
Next, add all of the flour to the mixing bowl and stir the ingredients together until a rough dough forms. At this point, cover up the bowl with a kitchen towel or shower cap and let the dough rest for 30 to 45 minutes.
To prepare the butter to be added to the dough
Cut the butter into cubes and let it rest at room temperature so that it can soften.
After the 30 to 45 minutes rest, uncover the dough and add all of the softened butter cubes right on top of the dough. Squeeze the butter into the dough with your hands until it is thoroughly combined with the dough and the dough starts to hold together again. Cover the dough and let it rest for 30 to 45 minutes.
Stretch & Folds
Next, give the dough it’s first set of stretch and folds. Uncover the dough and grab an edge of the dough and stretch it upwards, then when the dough begins to resist, fold it over the top of the dough. Continue stretching and folding the edges of the dough about 10 - 12 times total, or until the dough starts to resist stretching and firm up. After that, cover the dough up again and let it rest for 30 to 45 minutes.
Give the dough a second set of stretch and folds. The dough should be smoother and hold together better than it did during this next set of stretch and folds. Cover the dough and let it rest for another 30 to 45 minutes. I have done 3 sets of stretch & folds after every 30 to 45 minutes.
Finally, give the dough one last set of stretch and folds and then flip the dough over so the smooth side is facing up and the seam side is facing down. 
The First Rise (Bulk Fermentation)
Cover the dough with a layer of plastic wrap or shower cap (or close the bowl with an airtight lid) and then let the dough rise at room temperature, or for at least 8-12 hours , If you are staying in warm climate like Mumbai then dough rises in 3 to 4 hours. You want the dough to completely double in size, which can take more time than usual since this is a heavy, enriched dough. 
The dough should be doubled in size and ready to shape.
Dividing & Shaping
Take the dough on a just lightly floured surface. Divide the dough into nine equal-sized pieces. If you want to use a scale to weigh the dough balls precisely, scale them to nine dough balls.
Shape them directly into individual balls. Stretch and fold each piece of dough into a ball, and then roll the dough into a tight ball on the surface of the kitchen counter with your hand in a circular motion.
Arrange the dough balls in a 9×13″ baking pan lined with parchment paper. When evenly spaced out, the dough balls should be close but not touching each other. 
As the sourdough hamburger buns rise, they will touch and press into each other like pull-apart rolls.
Sourdough hamburger buns divided, shaped, ready to proof, kept them on the counter covered with an oiled cling wrap for 2 hours then refrigerated for overnight ( for 12 hours).
Here they are out from the refrigerator and kept for further proofing for another 2 hours or until they are almost completely doubled in size . They make take more time or less depending on the temperature in your kitchen.
Buns finally & fully proofed, ready to go into the preheated oven.
Brush them with egg or milk wash and bake in preheated oven at 200°C for 20 to 30 minutes. In my oven they got baked in exactly 20 minutes. Each oven temperature may differ so check accordingly.
Remove the baked rolls from the pan onto a cooling rack then brush them with butter or neutral oil. Let the the rolls cool for at least 30 minutes before serving for dinner.
My Notes
If you don’t want to make pull-apart hamburger buns, you can arrange them further apart on two sheet pans. This will prevent the buns from rising into each other and they will each be round and uniform after baking. Using a pastry brush, brush the buns with a tablespoon of melted butter or neutral oil. This will help keep the buns from drying out while they rise and it will stop them from sticking to the plastic wrap.
You want the buns to almost completely double in size during the final proof, so this might require an extra long proofing time. Hamburger buns that are proofed for less time tend to tear open on the sides/top during baking. Proofing them until they are very puffy, soft, and delicate will fix this issue. 
Properly proofed hamburger buns will also be softer and more airy on the inside, which is exactly what you want in this type of bread. 
Softest & fluffiest, pull-apart sourdough hamburger buns. that are sure to be a hit at your burger party.
Labels: Sourdough, Dinner Rolls, Buns,Bread Bakers, Eggless, Breads
#BreadBakers is a group of bread loving bakers who get together once a month to bake bread with a common ingredient or theme. You can see all our of lovely bread by following our Pinterest board right here. Links are also updated after each event on the #BreadBakers home page. We take turns hosting each month and choosing the theme/ingredient. If you are a food blogger and would like to join us, just send Stacy an email with your blog URL to foodlustpeoplelove@gmail.com.
We take turns hosting each month and choosing the theme/ingredient.
This month’s theme is Rolls & Buns.